Xiaomi Redmi Note 7 pro IMEI Repair Without Risk | Fix No Service Baseband Unknown
Xiaomi Redmi Note 7 pro IMEI Repair No Service Baseband Unknown Fix
Here is an amazing working guide for Redmi Note 7 pro IMEI repair to fix baseband unknown or no service error. In this guide, we will use official Xiaomi IMEI repairing tools and files [ QCN & EFS Reset Tool]. All the IMEI files can be downloaded from the below download section.
Just download all the IMEI repairing files with the appropriate tool and apply the below instructions as it is. Before going to jump into Redmi Note 7 pro IMEI repairing process, it’s a must to know that you have to flash TWRP recovery on the device for rooting.
PLEASE NOTE : IMEI repairing method and IMEI repairing files are same for both Redmi Note 7 pro MIUI 10 [Android 9] and MIUI 11 [Android 11]. So, don’t worry about the compatibility. Download files from the below download section and apply the exact same method properly.
Overview
The Redmi Note series is one of the best Smartphone series for all Xiaomi lovers. In this series, you can get numbers of Android smartphones according to your own budget. Redmi Note 7 Pro is another good name that is the best mobile of 2019 and still performing well. Actually, it’s an upgraded version of Redmi note 7 mobile with additional features. Out of the box user gets Redmi Note 7 pro with android 9(pie) & Android 10 (Q) MIUI 11 version. Technically it’s a Qualcomm chipset-based mobile that is responsible for smooth performance. Additionally, the Octa-Core CPU helps this device to run without lagging issues.
Now, this model is available in three different variants according to the RAM and internal storage capacity [4GB 4GB RAM, 64GB 6GB RAM, 128GB 6GB RAM].
At the time of launching, Redmi Note 7 Pro comes with the Android Pie MIUI 10 version. But recently Xiaomi updated this device with the latest android Q and MIUI 11 version to experience more features.
Because of all these reasons, Redmi Note 7 pro is still high-selling android mobile in India. But many users reported that they are getting no network on Redmi Note 7 pro MIUI 11 because of an invalid IMEI number. So, if you are also unable to make a call from Redmi Note 7 pro due to null imei or invalid IMEI then write IMEI on Redmi Note 7 pro MIUI 11 / MIUI 10. Otherwise, you can restore IMEI on Redmi Note 7 pro through the easy steps.
IMPORTANT : If the device is still in warranty then we recommend you to go to Xiaomi authorized service center to repair IMEI. But if the bootloader is already unlocked then repair IMEI of Redmi Note 7 pro using QCN IMEI file.
Download Redmi Note 7 pro IMEI Repair Tools and Files
Redmi Note 7 Pro IMEI Repair Tools & Files : Redmi Note 7 Pro Imei Repair No Service Baseband Unknown Fix.rar
OR
adb-setup-1.4.3.rar : DOWNLOAD
Efs Reset.rar : DOWNLOAD
Magisk-v20.4.zip / All Versions
mfFastboot.rar For redmi Note 7 Pro With TWRP : DOWNLOAD
redmi note 7 pro_patched.rar : DOWNLOAD
RELATED ARTICLES
Fix Redmi Note 7 GPS Problem Without Root – No Location Error
Redmi Note 7 Pro MIUI 10 Global Stable v10.2.7.0 Fastboot ROM And Recovery ROM
How To Root Redmi Note 7 Pro | Install Official TWRP | Unlock Bootloader
MIUI 11.0.10.0 Stable ROM For Redmi Note 7 Pro [ V11.0.10.0.PFHINXM ]
How To Write IMEI Redmi Note 7 pro MIUI 11 / MIUI 10 [Android Pie & Q ]
PLEASE NOTE : Root access is must to repair IMEI of Redmi Note 7 Pro MIUI 10 / MIUI 11. If you already have rooted Redmi Note 7 pro then you no need to root it again. skip the step 05
Step01 Prepare IMEI Files And Tools
- Download “Redmi Note 7 Pro Imei Repair No Service Baseband Unknown Fix.rar” and extract the file on the desktop. Here in this folder, you will see “mFastboot tool with TWRP recovery file”, ADB setup, efs reset commands, magisk zip file, and redmi note 7 pro_patched.qcn file.
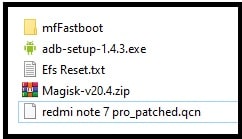
- Enter into extracted folder and install “adb-setup-1.4.3.exe” on windows pc.
Proper Method To Install Minimal ADB & Fastboot Tool On PC
Step02 Unlock Redmi Note 7 pro Bootloader
Same as other Xiaomi & redmi devices, Redmi Note 7 pro also comes with pre-locked bootloader from the manufacturer. This locked bootloader never allows the user to change or modify any system file of the device. So before doing anything, the bootloader must be unlocked. For this, use the official Mi unlock tool as a bootloader unlock tool.
Universal Method To Unlock Bootloader Of Redmi Note 7 pro
Ste03 Enable USB Debugging & OEM Unlock
Enable Developer Options : Go to “Settings” >> “About Phone” >>> tap 7-10 times on MIUI version. this step will enable the hidden “Developer Option” on your mobile.
Turn ON OEM And USB Debugging : Go to “Settings” >> “Additional setting” >>> “Developer Option” >> >enable USB debugging & OEM Unlock
Step04 Boot Redmi Note 7 pro Into Fastboot Mode
Now you need to boot your Redmi Note 7 pro into fastboot mode manually.
- Power off your device and wait for 5-10 seconds.
- Now press & hold the volume down key + power key at the same time and device will reboot into fastboot mode.

- Connect the device with pc via a working USB cable.
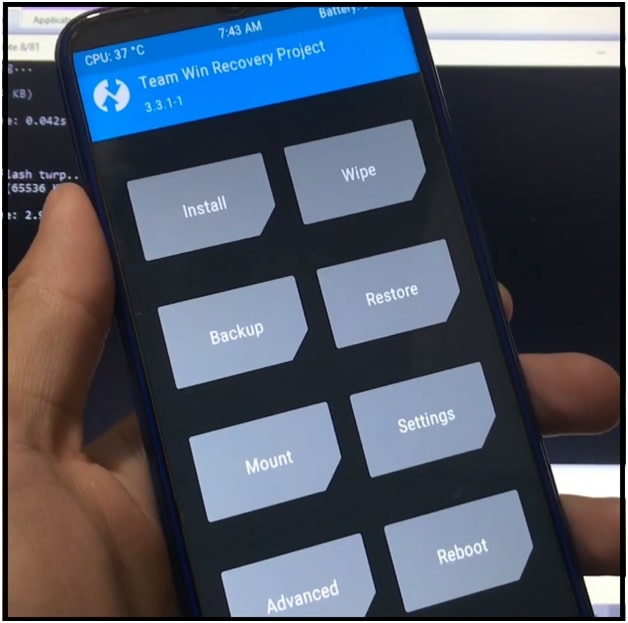
Step05 Flash TWRP Recovery And Root Redmi Note 7 pro
In this step we will flash TWRP on Redmi Note 7 pro via fastboot command. If you have already twrp installed the device then skip the step and follow the next step. Otherwise, TWRP recovery is a must to root Redmi Note 7 Pro mobile.
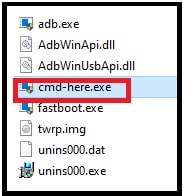
- Enter into extracted “IMEI Repair folder” >>> “mFastboot tool” folder and double click on “cmd-here.exe” to open the command window on pc.
- Now type the below command in the command-line window to ensure that your PC can communicate with your Realme 6 Pro over the fastboot mode.
fastboot devices
Above command will show an unique identifier (ID). If not, that means USB drivers are not installed or updated on your pc. In that case, we recommend you to install Qualcomm USB drivers on your computer.
- Next, type and execute the below twrp flashing command to flash TWRP on Redmi Note 7 pro.
fastboot flash recovery twrp.img
- Done!!! TWRP recovery flashed successfully. Now press & hold the volume up key + power key to reboot the device into the newly installed TWRP recovery menu.
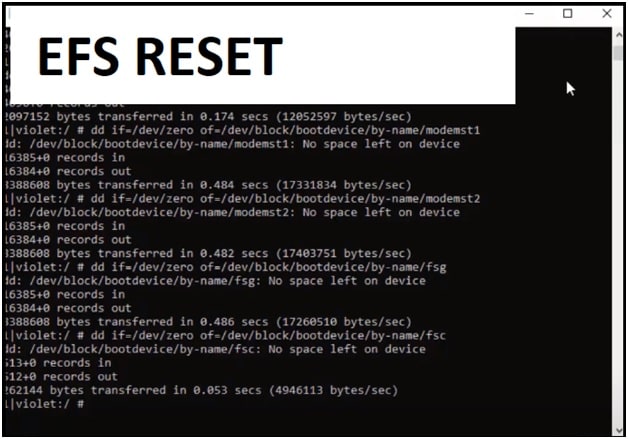
Step 06 Redmi Note 7 Pro EFS Reset
Make sure the device is properly connected with pc into twrp mode and then apply the below EFS reset commands one by one.
- Open “EFS Reset.txt” file and execute all the commands one by one.
adb shell
ls -l /dev/block/bootdevice/by-name/
dd if=/dev/zero of=/dev/block/mmcblk0p46
dd if=/dev/zero of=/dev/block/mmcblk0p47
dd if=/dev/zero of=/dev/block/mmcblk0p45
dd if=/dev/zero of=/dev/block/bootdevice/by-name/modemst1
dd if=/dev/zero of=/dev/block/bootdevice/by-name/modemst2
dd if=/dev/zero of=/dev/block/bootdevice/by-name/fsg
dd if=/dev/zero of=/dev/block/bootdevice/by-name/fsc
reboot
Step07 Root Redmi Note 7 Pro Using Magisk
Now root your Redmi Note 7 Pro MIUI 11 / MIUI 10 with magisk root package.
- Copy the “Magisk-v20.4.zip file” and move it into phone storage.
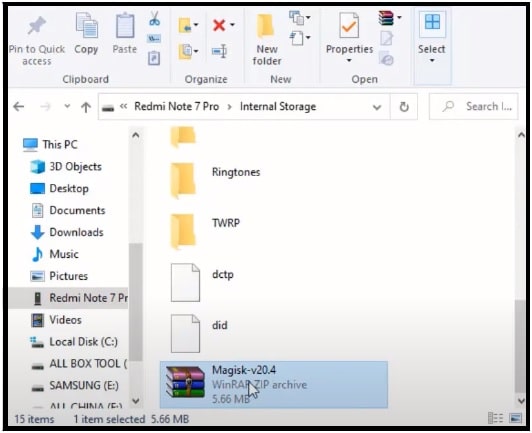
- Come to the device, tap on “Install” >> “select storage” >>. Browse “magisk file” from phone’s internal storage and flash it.

- After flashing, Tap on “Reboot System” >> “Do not install” and reboot device into phone storage.

- Just after reboot, check “Magisk Manager app” in app drawer. If it’s there that means you have fully working TWRP recovery with full root access.

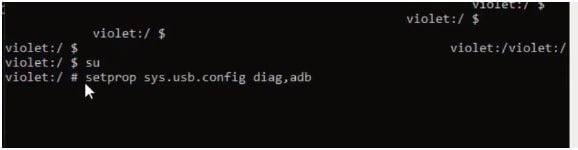
Step08 Enable DIAG Mode On Redmi Note 7 Pro
Now we can enable diag mode on Redmi Note 7 Pro MIUI 11 to repair IMEI. Diag port should be enabled on the device to continue the IMEI repairing process. For this, we will use adb commands.
- Again enter into “mFastboot Tool” folder and run “cmd-here.exe” file to open command window.
- Now type the below commands one by one and it will enable DIAG mode on the attached device.
adb devices
adb shell
Su
setprop sys.usb.config diag,adb
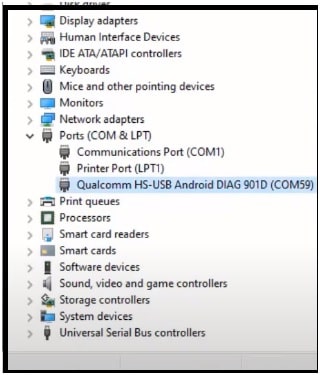
As a result, you will see “Qualcomm HS-USB Android DIAG 901D port” under the device manager section.
- Don’t disconnect the device from pc.
Step09 Redmi Note 7 Pro MIUI 11 IMEI Repair With UMT
Now we are in final step to fix IMEI on Redmi Note 7 Pro android Q / Android Pie mobile. In this step, we will use the Ultimate Multi-tool or UMT tool as a Redmi Note 7 Pro IMEI repairing tool.
- Launch “UMT QCFire tool” on pc >> navigate to “Xiaomi Special” >>> Type 15 digit IMEI number >> click on “Repair” button.
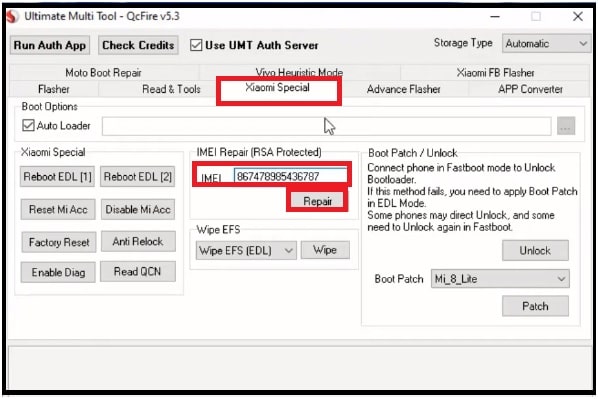
- A new warning pop-up message will appear in front of you. Click on yes to continue the next step.
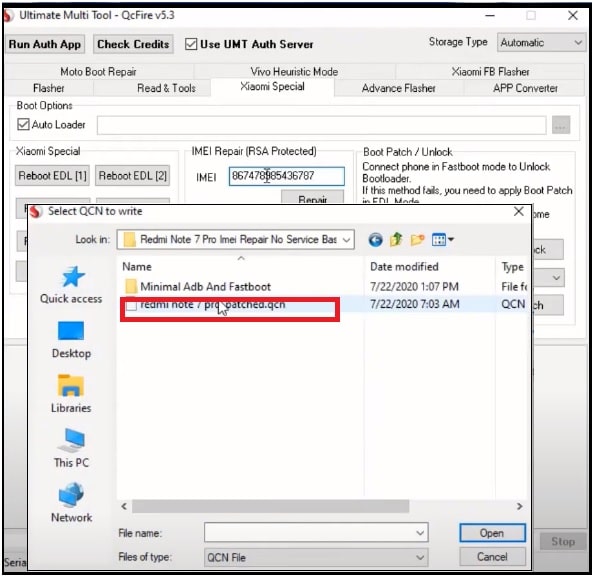
- Now you need to browse the “redmi note 7 pro_patched.qcn” file from IMEI repairing files folder.
- In next step, select the correct DIAG port and hit ok to start IMEI writing process on Redmi Note 7 Pro MIUI 10 / MIUI 11.

- Wait for couple of minutes and tool will write IMEI on Redmi Note 7 pro automatically.
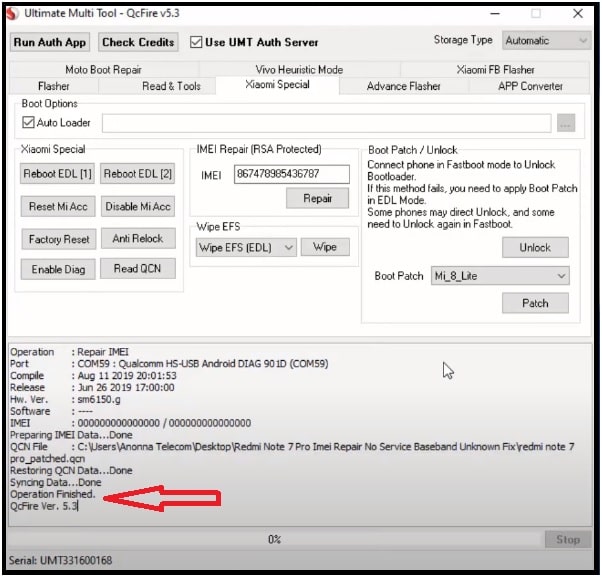
- Unplug device from USB cable and reboot it to apply the modifications. After rebooting, dial *#06# code and check IMEI status of the mobile. This time you will see the original iMEI of the device including the baseband unknown error fix.
This is all about “how to write IMEI on Redmi Note 7 pro using QCN file?” Follow the guide, download IMEI repair files for Xiaomi Note 7 pro, and then apply the necessary steps.
First-time users may feel difficulty writing IMEI on Redmi Note 7 pro, but all workaround is very easy and straightforward. You no need to go anywhere to repair network problems on Redmi Note 7 pro mobile. The attached Redmi Note 7 Pro IMEI files and tools are fully tested and working.