How To Root Redmi Note 7 Pro MIUI 10 | Install Official TWRP | Unlock Bootloader
How To Root Redmi Note 7 Pro MIUI 10 | Install Official TWRP | Unlock Bootloader
After a long time, we are here again with Redmi Note 7 Pro twrp recovery installation tutorial including root process. If you are a Redmi Note 7 Pro MIUI 10 user and love to customize or modify the device, this guide is for you. In this guide, we will show you the complete step by step Redmi Note 7 Pro root method.
If you have enough knowledge about rooting or custom twrp recovery then you may know that sometime it may risky. One single wrong step may brick the device permanently. So learn the below Redmi Note 7 Pro twrp recovery installation and rooting steps properly and then apply it on your own device.
If you are going to apply the below Redmi Note 7 Pro root steps exactly same as described, no need to worry about dead risk. Its 100% working and tested Redmi Note 7 Pro official twrp recovery installation and root guide. All the root files and twrp files are working properly on Redmi Note 7 Pro MIUI 10.2 Global stable version.
But before that its must to know that Redmi Note 7 Pro comes with pre-locked bootloader from manufacturer which will never allows user to make changes in system files. So first of all, you have to unlock bootloader of Redmi Note 7 Pro MIUI10 and then you can go for next step to install twrp and root process.
***New Update*** :
Redmi Note 7 Pro IMEI Repair – Fix Baseband Unknown
MIUI 11 Stock ROm For Redmi Note 7 pro
Universal Xiaomi MIUI 11 FRP Bypass Without Pc [ All Models ]
Model: Redmi Note 7 Pro MIUI 10
OS: Android Pie
Tested Version: MIUI 10.2 Global stable ROM
Success Rate: 100% working and Tested
How To Root Redmi Note 7 Pro And Install TWRP Recovery
This time Redmi Note 7 Pro twrp recovery installation and root process is little bit different from traditional methods. But don’t worry, we will explain each and everything with all necessary step which will help you to root Redmi Note 7 Pro without dead risk and without error.
Probably, you may know that bootloader must be unlock before any types of modification. With locked bootloader, you can’t install twrp recovery in any how condition. Same as, you also can’t root Redmi Note 7 Pro with locked bootloader.
So here we are splitting the complete tutorial in three major sections. Just follow them properly to get full root access on MIUI 10 Redmi Note 7 Pro android Smartphone.
Step01 Unlock Redmi Note 7 Pro Bootloader Officially
Step02 Flash TWRP Recovery On Redmi Note 7 Pro
Step03 Flash Magsik And Root Redmi Note 7 Pro MIUI 10
Step01 Unlock Redmi Note 7 Pro Bootloader Officially
As we already told you, bootloader unlocking should be your first step before going to step twrp installation or root process. Otherwise, there is no any way to root Redmi Note 7 Pro miui 10 without unlock bootloader.
Bootloader unlock process is an universal process for all Xiaomi or Redmi devices. For this, use “Mi flash unlock tool” and get the permission from Xiaomi to unlock bootloader officially.
Follow the steps and unlock Redmi Note 7 pro bootloader with official method.
- Enable USB debugging & OEM unlock [ Its Must ]
| Go to Phone’s “Setting” app >> Enable developer option >.> Enable Debugging & OEM |
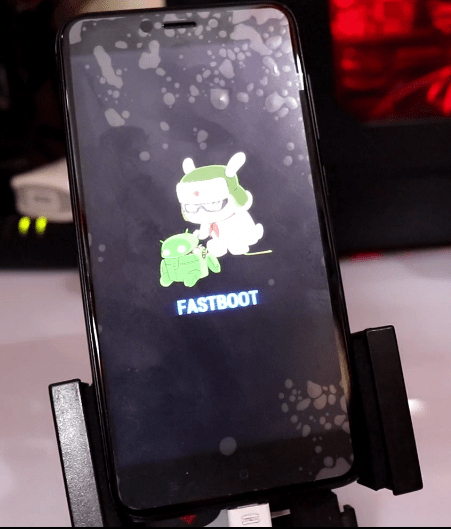
- Now boot device into “Fastboot Mode” by using Volume Down + Power key at the same time.
- Connect the device with pc via working USB cable.
- Download and install “Mi Flash unlock tool” on windows pc. You may also use portable Mi flash unlock tool.
- Launch “Mi Flash unlock tool” as administrator.
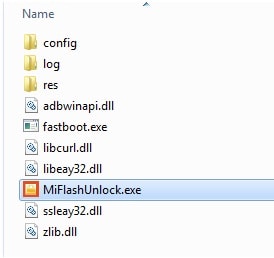
- Enter the same “Mi account” for login and then hit on “Unlock” button to start unlocking process.
- Done!! After bootloader unlock, you are free to install twrp recovery and root process.
Read the complete bootloader unlock process for any Xiaomi and Redmi devices including Redmi Note 7 pro MIUI 10.
Once you have bootloader unlocked redmi Note 7 pro mobile in your hand, come for next TWRP & root process.
Step02 Flash TWRP Recovery On Redmi Note 7 Pro
After unlocking bootloader of the device, now its time to flash official twrp recovery on Redmi Note 7 pro mobile. Its an official twrp recovery for Redmi Note 7 pro, so no need to worry about its stability.
Now download the below files to flash official custom TWRP recovery in Redmi Note 7 pro MIUI 10 and then continue the twrp installation process.
Download Redmi Note 7 Pro TWRP File And Other Files
|
||||
|
||||
|
||||
|
- Download all the files and save them in any one folder on pc for easy navigation.
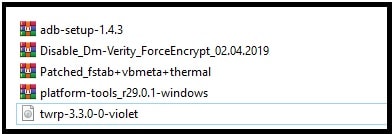
- Extract only adb-setup-1.4.3zip file and Platform tool.zip file.

- Now run adb-setup-1.4.3 file as administrator and follow the simple instructions to install minimal adb & fastboot tool on pc.
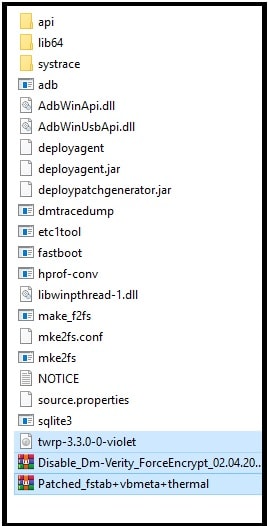
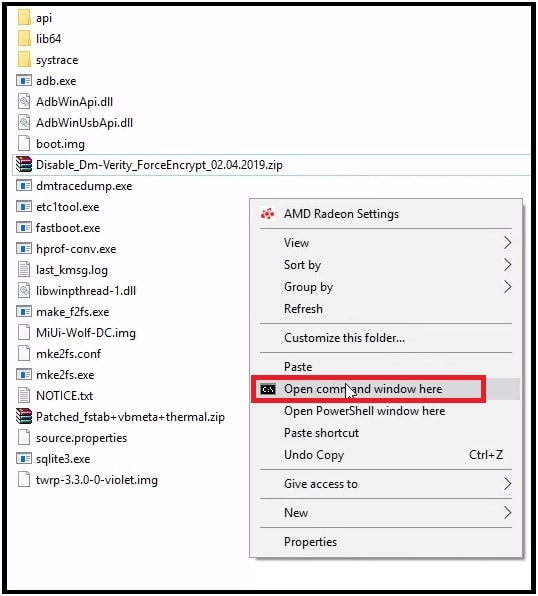
- Now copy and move all files [ twrp-3.3.0-0-violet file, Dm-Verity_ForceEncrypt zip file, Patched_fstab+vbmeta+thermal.zip file” into extracted “Platform Tool” folder. [ IMPORTANT ]
- Now click on blank area in “Platform tool’s folder” >>> Press & hold “Shift” key + “Right click” from mouse and select “open command window here” or “open powershell window here” option as shown below. It will open a new command window on pc.
- Come to the device and boot redmi note7 pro into Fastboot mode manually.
Power Off >> Press & hold volume down key + Power key. Release the keys, once you are able to see bunny logo. That means device is now into fastboot mode.
- Connect the device with pc into fastboot mode.
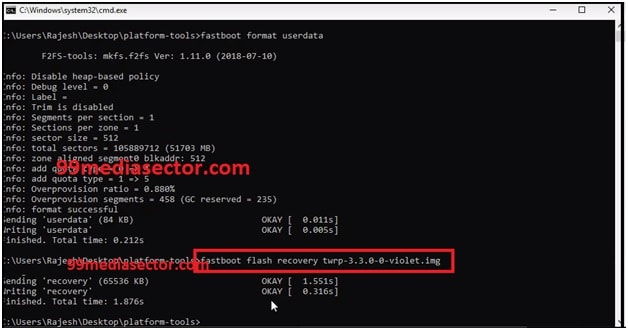
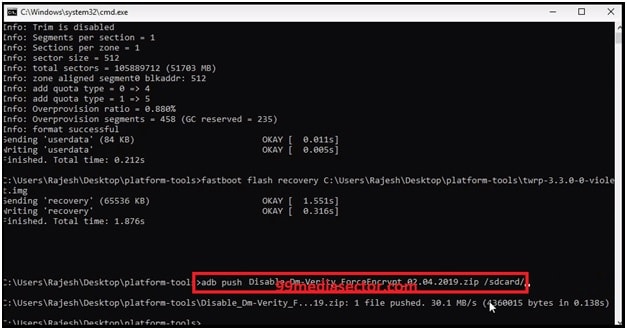
- Come to the windows tool again and execute the below command to wipe user data of the device.
fastboot format userdata

- Again type the below command to flash twrp recovery through your pc via fastboot command.
fastboot flash recovery twrp-3.3.0-0-violet.img
Note: you can also drag and drop twrp-3.3.0-0-violet.img file into command window just after “fastboot flash recovery” command.
PLEASE NOTE: TWRP recovery flash done but remember don’t boot device into normal mode. Otherwise, device may stock into MI logo or bootloop.
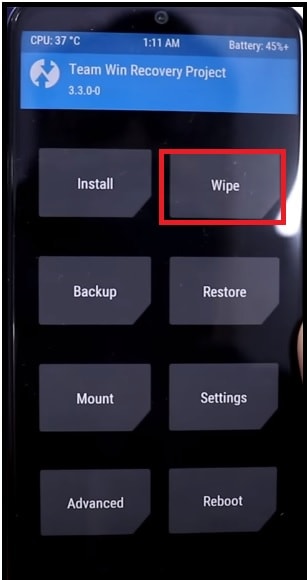
- Now directly boot device into “TWRP recovery” by pressing below combinations.
- Don’t disconnect the USB cable from mobile.
- Once you are into newly installed TWRP recovery menu, tap on “Wipe” option >> “format Data” >> Type “YES” and it will wipe phone data completely.
- Now come to command window again and type the below command to transfer “Patched_fstab+vbmeta+thermal.zip” file into phone.
adb push Patched_fstab+vbmeta+thermal.zip

- Again type the below command to transfer the “Disable_Dm-Verity_ForceEncrypt_02.04.2019.zip file”.
adb push Disable_Dm-Verity_ForceEncrypt_02.04.2019.zip
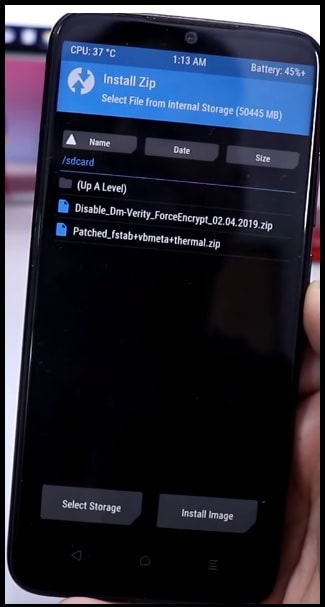
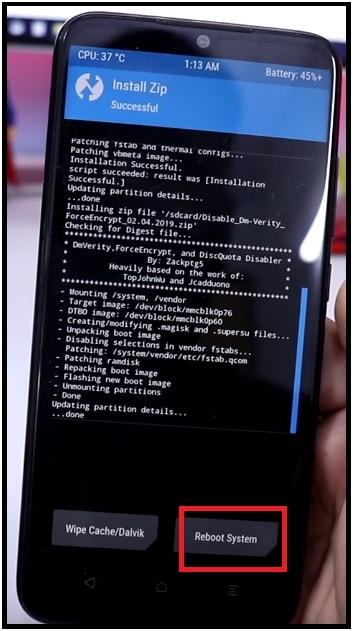
- Again come to the device, tap on “Install” option >> here you will see both “Patched_fstab+vbmeta+thermal.zip” and the “Disable_Dm-Verity_ForceEncrypt_02.04.2019.zip file”. Just click and flash both zip files one by one.
- After completing the process, click on “Reboot System” >> “Donot install” and device will boot into android OS again without error.
- Done!!! Official TWRP recovery installed in Redmi note 7 pro safely.
Step03 Flash Magsik And Root Redmi Note 7 Pro MIUI 10
Bootloader unlocking and TWrp recovery installation both are the major steps in order to root Redmo Note 7 pro. Once you have twrp recovery on your device, its very easy to flash root file on redmi Note 7 pro MIUI 10 smartphone.
| Download Redmi Note 7 Pro Root File [ Magisk Or SuperSu ] | |||
|
Note: Users can use any Magisk or Supersu zip file to root any device. Here we are showing the redmi Note 7 pro root with Magisk zip file.
- Connect the device with PC via USB cable and move the downloaded “magisk zip file” into phone storage.
- Boot device into “TWRP Recovery Mode” by using key combinations.
- Once you are into TWRP recovery menu, click on “Install” button and browse “Magsik.zip” file from phone storage.

- Swipe to confirm to flash selected “Magisk file” and it will take few minutes to flash root file.

- Select “Reboot System” >> “DoNot Install” and device will reboot automatically.
- After rebooting, find the “magisk app” in app drawer and open it.
- Check “magisk Update is available or not”, if yes update it.
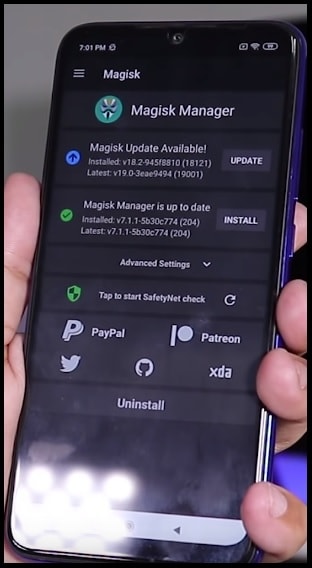
- After update, don’t forget to reboot the device again. Its important to apply the changes.
- Done!! Redmi Note 7 pro rooted with Magisk manager root file.
This is our complete guide to root redmi Note 7 pro including bootloader unlocking and official twrp recovery installation instructions. Just download official twrp and flash it on redmi note 7 pro and then root it using Magisk or Supersu exploit. After getting full root access on Redmi Note 7 pro, you are free to install custom ROM to experience upcoming android features. Moreover, you can add different custom settings which are not possible in non-rooted devices.
Till now getting any issue in any step or have any question about the tutorial, please leave your comment below.