Turn off Column And Row Numbers in Excel When Printing
Turn off Column And Row Numbers in Excel When Printing
Are you searching for a way to print excel documents without column letters and row numbers? If yes then this tutorial is for you. Here in this guide, we will show you how to turn off column and row numbers in excel when printing.
If you are new and don’t know more about Microsoft Excel then read the following tutorials. These excel tutorials will help you to learn and use excel documentation with full potential.
- How To Add Degree Symbol In Excel Sheet (All Possible Ways)
- Microsoft Excel Not Working – Fix Excel Not Responding, Freezing, Stop Working
- How To Delete Multiple Excel Rows At the Same Time
- How To Add PDF To Excel – Insert PDF File In Microsoft Excel
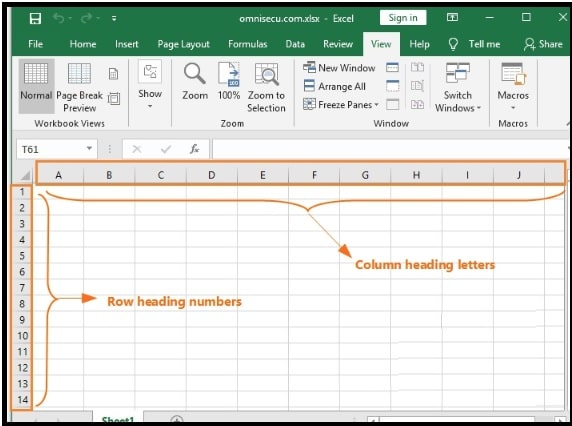
Microsoft Excel software offers so many useful tools and options that can be used to add or remove from your printed document. The ability to include column headings and rows when you print is also one of them. Serial numbers on the left side and letters at the top help users identify the location of cells.
Similarly, these columns and rows are helpful to view a full excel document on the screen.
In daily work, cell identification is very important to apply formulas.
But what you will do, if you really don’t want to print an excel document with column and row numbers?
Fortunately, the Microsoft Excel tool comes with Printing row and column headings that can be turned OFF and ON according to the user’s need. Additionally, users can set this option as a default option and it will stop printing row and column heading for them.
If your excel sheet has been modified or you don’t want to show row numbers including heading then this tutorial is for you.
Let’s see how to turn off the headings in Excel 2013 and other MS Excel versions.
Remove Heading When Printing In Excel 2013
Here are the full steps to turn off column and row numbers in Excel when printing.
Suppose, you have an excel sheet that includes a column heading at the top and row numbers in the left side when you are going to print it. But if you don’t wish to show in your hard copy, apply the following instructions and these raw and column letters will no longer be a part of your printed document.
The process is very simple to hide rows and columns in excel sheet before printing. Just navigate to the page layout and modify the printing option.
- Open the Microsoft excel worksheet or document on your pc or laptop.
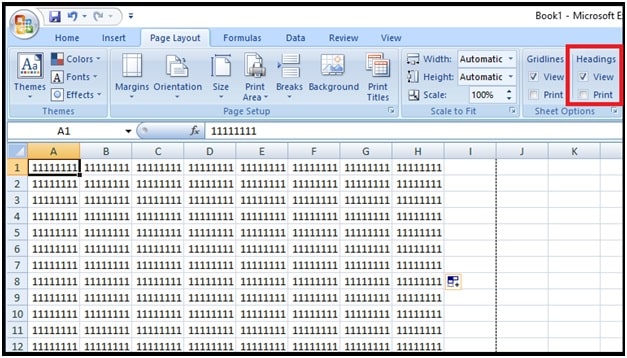
- Navigate to the layout option tab (Find it between the “Insert” and “Formulas” tab )

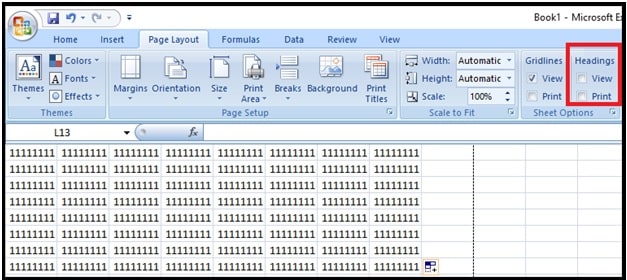
- Now go to the “Sheet Options” section >>> click the “print” option under the “Headings” section of the ribbon. This action will remove the check mark from the box as shown below.
- All done!!! Now go to “File” from the top left of the screen, click the “print” option, or press the “Ctrl + P” option and it will print an excel document without row and column headings.
It’s also important to know that this setting works on a worksheet level. So, you have to change it again, if the document settings have been modified.
How To Print Row Numbers And Column In Excel
By default, Excel sheet printing settings are set to print without column and row numbers. That means, default settings allow users to take print without heading and row number to get more space.
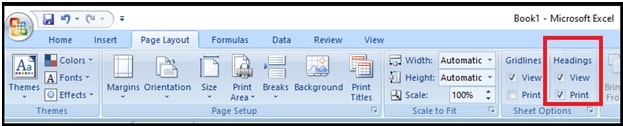
But if you want to include a row and heading in your print then enable it again by following the below steps.
For this,
- Open the excel sheet that you want to print with row numbers and column headings.
- Go to the “Page Layout” section.
- Click the box to the left of the “print” option as shown in the screenshot below. Find it under the “Sheet option” section.
- Done!!!
Additional Information For New Users
Method 01 Hide Or Show Excel Row And Column Heading
If you don’t want to include rows and columns in your excel worksheet then apply the below steps …
Step 1 Open your excel sheet >>> click on the “View” tab on Excel Ribbon.
Step 2 Go to the “Show” Group in Ribbon’s “View” Tab as shown below.
Step 3 Simply, uncheck the “Headings” checkbox from the available options to hide Excel worksheet Row and Column headings.
Done!!! You have successfully removed the column heading and raw numbers from your excel worksheet for viewing and printing at the same time.
Method 02 Hide and Show Excel Column and Row Numbers from “Excel Options”
Step 1 – Open Excel document on your pc.
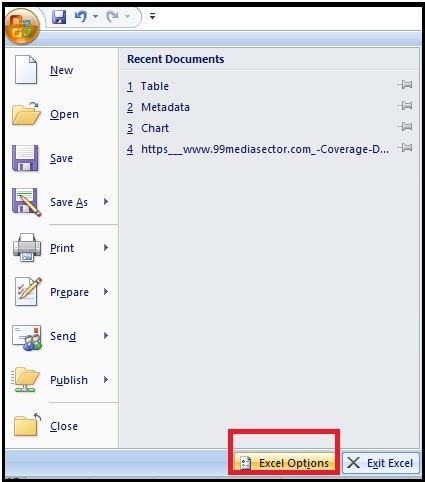
Step02 go to “File” from the top right corner of the screen.
Step 03 Select the “Excel Options” window from Excel Backstage View.
Step 4 Find and open the 5th option or “Advanced” option from the list.
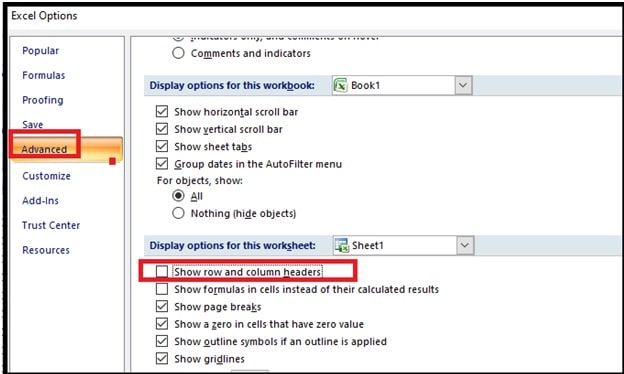
Step 5 Scroll down the screen and go to the “Display section for this worksheet”. Select the relevant worksheet in the “Display options for this worksheet” heading.
Step 6 Now uncheck “Show row and column headers” Checkbox to hide Excel Row and Column headings.
Step 7 Save the modification by clicking the “OK” button.
These are the working solutions to turn off and turn off column and row numbers in Excel when printing. Simply follow the guide, navigate to the “layout” section and enable or disable print option to keep or remove row and column when printing your excel document. Moreover, check how to freeze row in Excel sheet.