How To Record Screen with Audio on Windows 11 – Free W11 Screen Capture Tools
Recently we shared detailed guides on “how to screen record with audio on w10” including “Android built in screen recorder”.
In today’s guide, we will learn different methods to record screens on windows 11 with audio. Screen recording with audio on Windows 11 pc can be done via the built-in Xbox Game Bar app or OBS Studio software or filmora. OBS Studio is a popular video streaming and recording third-party software for professionals. Alternatively, wondershare filmora is another big name in this category.
Let’s start the guide, learn all about the screen recording apps & software, and choose one of them according to your choice.
Pc screen recording with audio is not a big task in windows OS. Every Windows OS version supports this feature for editing and creation.
But it’s also important to know that built-in software to record screen doesn’t provide many options if you are a professional video editor. That’s why users have to rely on third-party video recording apps and software for different purposes.
Probably you may know that the Xbox Game Bar was introduced with Windows 10. When it comes to recording screens with audio in w11, it can be used as a basic screen recorder with limited customization features.
For the advanced level of video editing, professional video screen recorders like OBS, Filmora and open broadcast are good choices.
Additionally, NVIDIA graphic card users can also use dedicated Software like GeForce Experience or AMD Radeon Software to record screen with audio.
Best Choice Between Xbox Game Bar and Third-Party Screen Recording Apps
There are a few basic differences between the built-in Game bar and dedicated third-party screen recording software.
Let’s see the pros and cons of this software when it comes to recording your pc screen.
XBOX Game Bar
PROS
- It comes as a pre-installed native pc screen recorder for windows 11 OS
- Too lightweight and not required extra space.
- Ready to use setup
- Simple and clean user interface and not required technical skill
Cons
- Limited controls to manage quality and usability
- It runs as a background application when you are not using it purposely.
- Advanced features are not included for professionals.
Third party screen recording Software Pros & Cons
Pros
- Allows you to choose multiple video qualities from different formats.
- Comes with advanced features and is highly recommended for professionals.
- Full control and managing ability to record the home screen in different manners.
Cons
- Manual installation required.
- You have to learn and understand its controls and features for more efficiency.
- Required extra space on your hard disk for installation and smooth performance.
It’s important to know that third-party video recording tools require a setup tool and it may be difficult for some users. Similarly, each and every professional tool comes with different features and different layouts. So, if you don’t know how to use it then it may be time-consuming for you. A powerful computer with a dedicated GPU is important to render high-quality videos on Windows OS.
I hope it’s quite easy to understand what is the difference between Xbox Game bar recorder and third party tools to record videos and audio.
Different Software To Record Screen with Audio on Windows 11
Without any doubt, professional tools are highly recommended for video or audio editing including screen recording. But it depends on your requirements.
Your requirement, hardware compatibility is enough to select and use the desired tool for pc screen recording.
(A) Xbox Game Bar Screen Record With Audio – How To Use
The use of Xbox Game bard to record your screen is very easy for any newbie user. It’s a background running application and works like an overlay at the time of recording.
For example, when you are playing a game and want to record gameplay with audio, just press the Windows + G from the keyboard. This shortcut key will bring up the game bar overly on the screen to select desired functions.
Just after pressing the Windows + G shortcut key, overly will appear in front of you with multiple functions. Find the main control menu for Xbox Game bar from the top middle of the screen.
Let’s see how to use Xbox game for screen recording with available audio.
- Open your game or application on your pc that you want to record.
- Now press the windows + G key from the keyboard and it will launch an overlay screen to screen record.
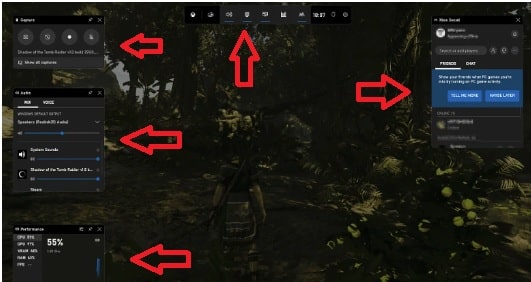
- On the top-left area, you will see a widget called “Capture”. This is the recording widget that we will use in pc screen recording.
- Now configure the tool to record screen with audio.
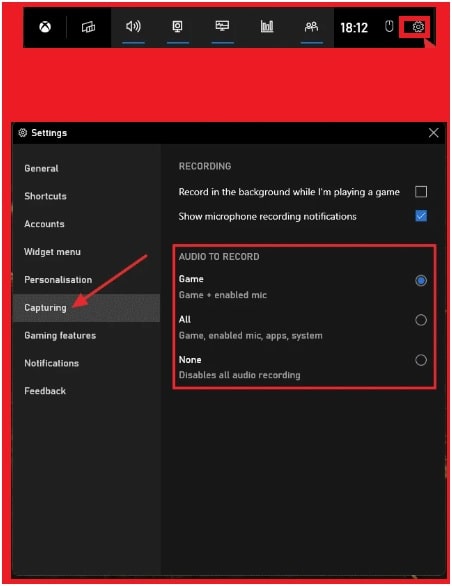
(a) Find the “Gear Icon or Settings” from the horizontal “Game Bar”.

(b) Now the Game Bar Settings window will appear in front of you to enable audio recording.
(c) Select the “Capturing” option from the “Settings window”.
(d) In the right side panel, you will see different settings for audio recording. Select the “game” option, if you wish to capture gameplay with game audio only. Alternatively, select the “All” option and it will configure to record every audio source of your pc like click, microphone, browser and any other app.
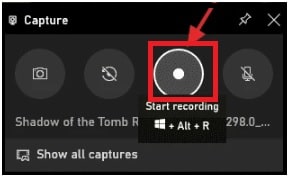
- After enabling the audio recording, it’s time to record and capture your pc screen. For this, go to the “Capthe ture” section >>> Click the “Start recording” option or “Dot” icon or press “Windows + ALT + R” from the keyboard.
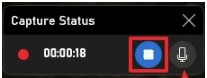
- Instant screen recording will start on your windows 11 and you can see the duration of the current recording in the newly opened widget called “Capture Status”.
- If you want to stop video recording, just click the blue circle button or by pressing the Windows + ALT + R again.
- After stopping the recording, you will see a new “Game clip recorded” notification on the same screen.
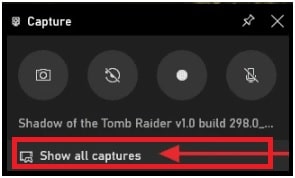
Find The Recorded Video On PC
Now you have two options to find your recorded video on your pc. For this, click the “Show all captures” option on the Capture widget and it will open the directory in front of you. Here you can see new and all other recorded videos.
Otherwise, follow the below path that Xbox Game Bar uses to save videos on Windows OS.
C:\Users\*your user name*Videos\Captures
You’ll find your recorded videos clip under the Videos folder in a subfolder called Captures. All the recorded clips will be in MP4 format with compatible audio file. Additionally, you’ll also find the video clips in the Game DVR menu, where you can trim a video according to your own choice and share it on Xbox live (only if it’s a game).
This is how we can use Windows 11 native screen recorder tool for screen capture with audio. Xbox game bar tool is a lightweight screen recording tool for w11 OS. But you can’t use it to record audio without video. If you want to separate audio from video, find online tools from Google.
(B) OBS Studio For Screen Record with Audio on Windows 11
OBS studio is a third party professional tool for live stream and screen Record with Audio on Windows 11. If you try to search for the best screen recording software for windows PC, you will see several results for the same.
But Open Broadcaster Software (OBS) is highly recommended software to record your computer screen with audio. It’s an advanced video capturing and video streaming software that is available as a free tool.
Just because OBS comes with lots of advanced customizations features, you have to learn its basic working steps.
Here are some reasons to choose OBS studio, if you are looking for third party software to record screen.
- OBS studio is completely free with all features. Available at no cost.
- One click installation setup.
- High configuration based computer not required. Run smoothly on a normal PC.
- Manage and control pc recording and audio quality.
Step01 Download And Install OBS Studio On W11 PC
- Visit the link and download latest version of OBS studio installer for pc. (DOWNLOAD)
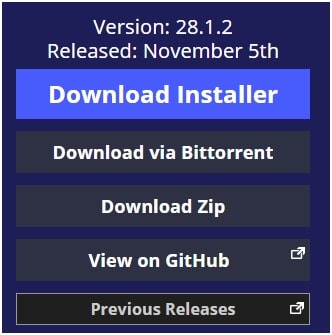
- Once you are on the downloading page, click the “Download Installer” option and save the file on your pc.
- Now go to the download section, select the “Installer” >>> run the setup >>> and follow on screen instructions for successful installation.
Step 02 Launch OBS Studio
- Once the installation is done, search for “OBS Studio app” and run it as administration.
- First time users may see the “Auto-configuration Wizard”. Click the “cancel” to dismiss the Auto-configuration process.

Step03 Configure The OBS Studio For Video Recording
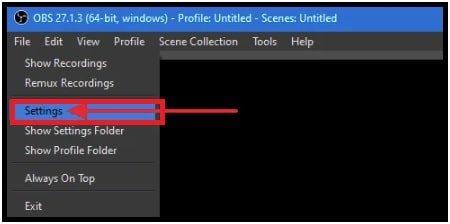
- Click the “File” from top left >>> select the “Settings” from the available options.
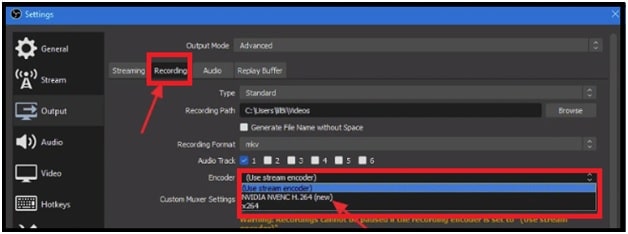
- Once the “Settings” window opens in front of you, navigate to “Output” option >>> change the output mode from “Simple” to “Advance” as shown below.

- After selecting the “Advance” option, you will get more customization options. Navigate to “recording” tab >>> change Encoder to your GPU encoder.
Step04 Configure The OBS Studio For Audio Recording
After changing the video recording options, now it’s the time to configure audio settings in OBS studio.
On the same window,
- Set the “rate control” as “CBR”.
- Next, set the bitrate, just below the rate control section.
NOTE: Bitrate means the amount of information that will be recorded each second while you are recording your screen and audio.
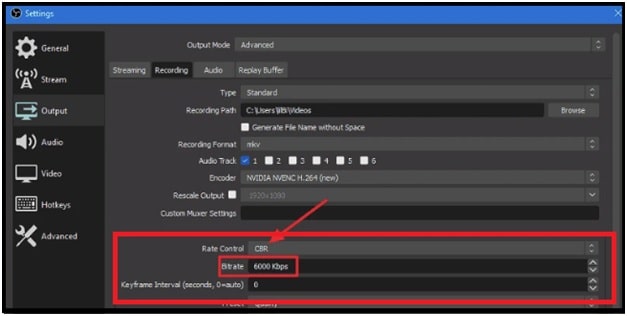
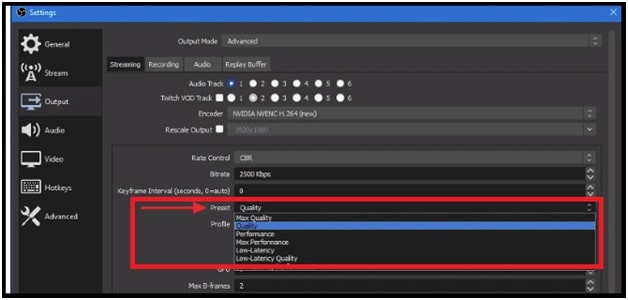
- Next go to the “Preset” section and set it to the “Quality” option. If your pc is unable to handle it then set it to the “Performance” option.
- Finally, click the “Apply” button to save the changes.
- Next, select the “Audio” section from the left sidebar >>> select the “‘Desktop Audio” settings from the ‘Global Audio Devices’,
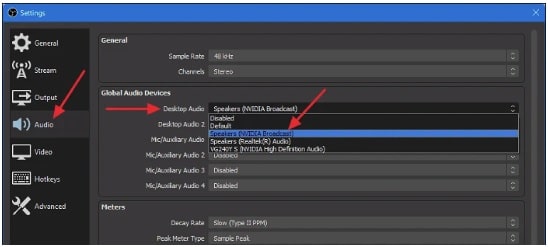
- You have successfully finished the audio configuration on OBS studio for audio recording.
Step05 Start Screen Capture With Audio Using OBS Studio Tool
After configuration audio and video settings, now it’s the time to use OBS studio for recording. But it’s important to know that there is no direct option to start recording.
You need to create “Scene” and “video source” for screen record.
- Run the application (game) or anything that you want to record.
- Next, create a new scene. Under the Scenes section at the bottom left corner, you will see a ‘Scene’ is already present. Just right-click on it >>> select ‘Rename’.

- Rename the scene as anything like a screen record.
- Now add the source that you want to record. Click the “+” icon to add a video source. Here you will see multiple options and you have to choose one of them according to the availability.
NOTE: Select the ‘Window Capture’ to capture a specific window or choose the ‘Display Capture’ to record everything that is running on your screen.

- Next, add your source name and click OK.
- Now select the window or screen that you want to use for recording or choose the application name.
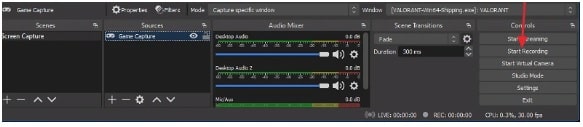
- Everything is configured perfectly and you are ready to start recording your pc screen with desktop audio. Click the “Start Recording” button from the bottom-right side of the window.
- Anytime you can stop screen recording in OBS studio by pressing the hotkey or pressing the “Stop recording” button.
This is all about how to configure OBS studio to record screen on windows 11 with audio. Additionally, there are several settings to change the quality and mode of recording according to your own choice.
(C) Capture Windows 11 Screen Using Filmora Tool
Wondershare filmora is a video editing tool for professionals. Right now most video creators use it to create professional YouTube videos. At the same time, we can use the same tool for windows screen recording in one click.
No doubt OBS studio is a much better tool for video streaming and recording but configuration is a little hard for newbie users. If you are looking for a tool to record windows pc screen with audio then filmore is highly recommended.
It provides a single video and audio recording in different formats.
Let’s see how to use Filmora tool for Windows 11 screen recording?
- Download and install a free filmora tool on your w11 pc or laptop.
- Run the tool as administrator.
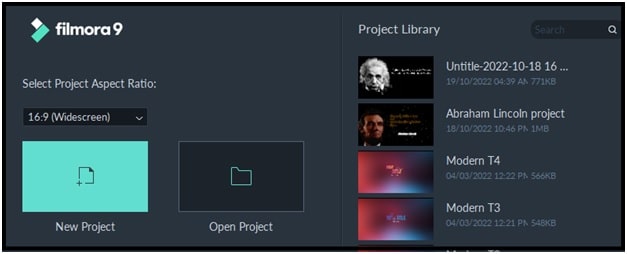
- Once the tool is launched, select the “new Project”. Alternatively, select the desired aspect ratio from the available option.
- Now a full screen window will appear with lots of functions. Just click the “Record” drop down arrow to show different recording options.
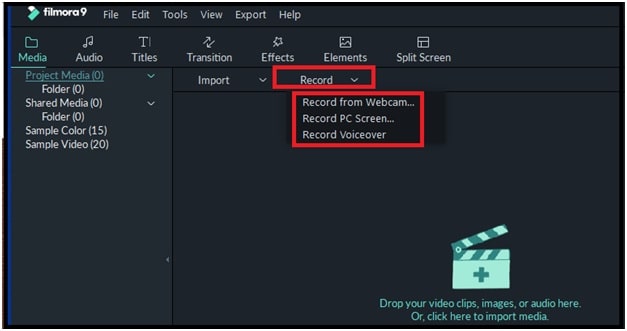
- Here you can select only audio recording or pc screen recording or webcam recording option.
- To record a PC screen with audio, select the “Record Pc screen….” Option.
- After selection of “Record Pc screen….” Option, it will open a small recording toolbar.
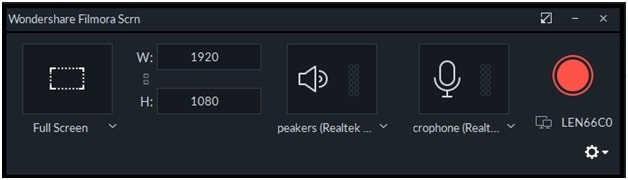
- Click the “Full screen” drop down arrow to select how you want to record the screen. Select “Full Screen” or “Custom size” or “Target window (if you are using multi screen).

- Now just press the “red recording” button from the same toolbar and it will start recording with audio after countdown.
- Press the “f9” to stop screen recording anytime.
- Once the recording is completed, drag the file into the timeline, remove the unwanted part or edit the video (if you want) and export the file.
- Done!!
(D) Record Screen On Windows 11 With Audio Using GeForce Experience
This method is only for those who are using an NVIDIA graphic card in their pc. NVIDIA users can easily record screen with audio using the Nvidia Shadowplay. Nvidia Shadow play and Xbox Game bar both are almost same in functionality.
If you are using an NVIDIA graphic card, then you do not need to install it separately. It should already be installed to update your graphic card’s driver.
- Search for “GeForce Experience” from the start menu >>> Launch the app as administrator.
- Once it opens on your pc, click the “Settings” icon from the horizontal toolbar.
![]()
- Now make sure that the ‘IN-GAME OVERLAY’ toggle is turned on before recording.
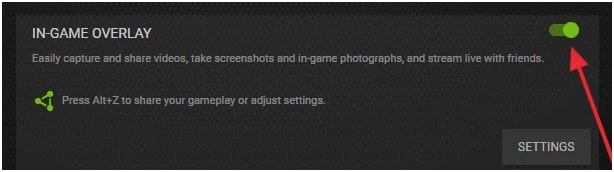
- Now open the screen or game that you want to record instantly >>> press the “Alt +Z” shortcut key for GeForce Experience overlay.
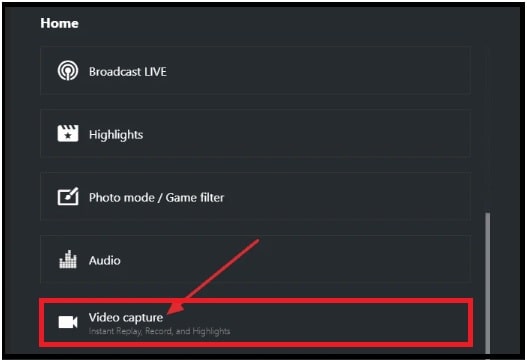
- Again click the “Gear” icon as shown below.

- Here you will see multiple options under the settings section. Find and select the “Video Capture” option.
- Under the video capture section, select the quality of video, bit rate and FPS etc.
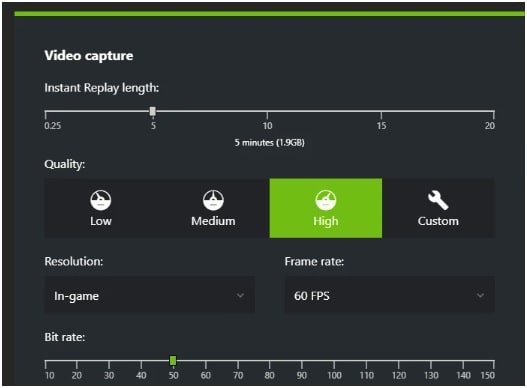
- After configuring the video settings for recording, close the windows and go back.
- Same as Video, this time you have to select the “Audio” option from the left side bar.

- In this section, choose the audio source as desktop audio or microphone. Also you can select the desired microphone for recording, if you are using the multiple microphones as audio source.
- Save all the changes, close the window and go back to the home page of the tool.
- Click the “Record” button from the GeForce Experience overlay screen. Alternatively, press the “Alt + F9” hotkey to start reordering during the game.
- When you want to stop recording on the pc screen, press the “ALT + F9” from the keyboard or stop it by just pressing the “Stop” button from the overlay screen.

- All done!!!
These are the best default screen recording software for windows 11 including third party software. If your requirement is only recording then default tools are enough for pc screen recording with audio. You do not need to go with professional tools because some of them require proper configuration.
But wonder share filmora allows users to capture windows screen in one click. In case of any software bug or glitch, restart windows 11 and then apply the correct settings again.