How to Use Split Screen in Windows 11 | Enable Multi Screen Setup
How to Use Split Screen in Windows 11 | Enable Multi Screen Setup
In today’s guide, we are going to see how to set up multiple screens on w11 which is also known as split screen. Microsoft offers several multitasking features to make it a more efficient and reliable operating system. The split screen is a very well-known feature that allows you to convert your single screen into multiple screens. In short, with the help of split-screen features users can operate a single monitor for multitasking.
If you are a trader or software developer then switching between different taps or applications can be a time-consuming and confusing task.
To deal with this issue, we have the option to create multiple monitor setups. But the actual multi-monitor setup is quite costly and requires an additional graphic card for output.
Microsoft considered this requirement and implemented a split-screen feature to boost multitasking routines.
Split screen renamed as a Snap layout for w11 OS. So don’t be confused with their names. The latest snap layout feature allows you to view and access multiple windows, tabs, and apps at once by splitting your one screen into multiple sections.
What Is Windows 11 Split Screen Feature?
Same as the Android split screen, Windows OS offers a split screen feature to divide the screen into two or more portions. After adding this feature, users can easily run two or more apps or web browsers at the same time.
Actually, the windows split screen feature is not a new multitasking feature. Previously, this feature allowed you to divide your screen in two parts only. But now the new windows 11 OS added a new split-screen option to use more than two screens simultaneously.
With windows 11 OS, split screen is available as Snap layout to add multiple screen setup. With this new future, you can set up four screens for four different apps at the same time.
The best thing is that the split screen option is available in the latest windows 11 as a pre-installed application. So, you need to enable it, if it’s your first time. Otherwise, you will be limited to using the dual screen in split screen configuration for the w11 desktop.
if you already know about the split screen and searching way to fix split screen not working in windows 11, read the troubleshttoting guide.
How to Use Split Screen in Windows 11
The most common method for splitting your screen is, to press the “Windows key + Right” or “Windows Key + Left”. Alternatively, use the windows Snap, virtual desktop, and Snap layouts.
But before that you need to check if windows 11 split screen features are enabled or not. For this, you have to enable snap windows settings that allow splitting the screen on w11 pc.
Step01 Enable Snap windows in W11 Through The Settings
Split screen is a very popular multitasking feature in Windows 11 OS. But for many, it doesn’t work. Reasons may be different for different users but your first step should be to verify that the feature is enabled. Check out the instructions to enable split screen function in w11 pc.
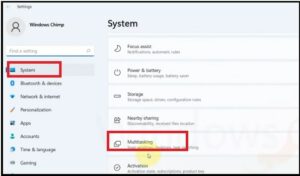
- Come to your pc, and press the “Windows key + I” to launch the “Settings” app. This action will open the System settings in front of you.
- In the System settings, scroll down a little bit, find and open the “multitasking” option from the right side area.
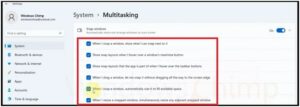
- Once you are under the “multitasking” section, turn-ON the “Snap Windows” option. If already enabled then leave it as it is.
Once you are done, restart your windows 11 pc for once and check the result.
Step02 Different Methods To Use Split-Screen On W11 PC
There are multiple ways to use split screen on windows 11 desktop pc. Here we are adding all the possible methods for you. Check out the guide and select the best and most useful method according to your needs.
Lets see how to split screen on windows 11 using different methods.
Method 01 Windows Snap Assist to Use Split the Screen
The very first time Microsoft introduced the Snap assist feature with Windows 7 OS which is still available in the latest w11 OS for laptops and desktop pc. With the help of this feature, you can view the screens side-by-side easily.
You can quickly split the screen using the snap assist function but it is a little bit complicated for first-time users because there are no graphical buttons for that.
Let’s see how to use windows Snap method to split the screen.
- First open the Windows that you want to place on the screen, then click on the Windows title bar and drag it to the place that you want to put it to maximize the window. Place it at the top of the screen.
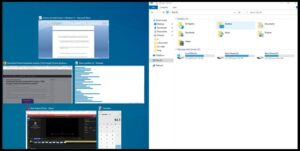
- Once you place a window, you will see a split screen with the item you dragged and other open apps/windows on the other side. Now the snap assist will guide you to place the next Windows.
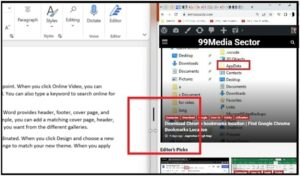
- After adding two windows, resize the window size by hovering the cursor between the screens and drag & drop to resize it.
If you find this method difficult for you, use the multitasking snap layout to split the screen easily.
Method 02 How to Split a Screen With Snap Layout in Windows 11
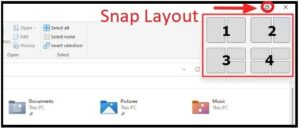
Snap layout is a newly added multitasking feature to split screens in windows 11 pc. Just click the “maximize” icon from the windows and it will show all the available snap layouts to divide your screen into parts. It’s the easiest way if you really want to use a multi-screen screen on a w11 pc. For many people this option is annoying and they want to disable it.
To use snap layouts on windows 11, hover the mouse over the maximize button, and you’ll see the 4 different layout templates. The layout shows how your windows will arrange on the screen after selection.
Follow the instruction to split screen using the Snap layout multitasking feature.
- First option will split the screen into two equal parts. That means you can use two apps or windows in one single screen with the first snap layout option.
- Second split options also divide the screen into two parts but both are different in size. The one on the left occupies more space than the one on the right.
- Third option is useful to split the windows screen into three parts. The left half is covered by one window and the right half is further split into two quarters.
- Forth split screen option will split your screen into 4 different parts with equal sizes.
- Open the app windows that you want to use for split screen.
- Hover your mouse over the maximize button and it will show all the available split screen layouts.
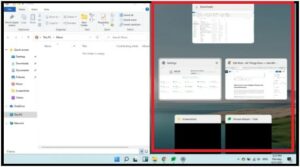
- Select one of the parts of the first option and it will open the select windows in the selected half of the screen.
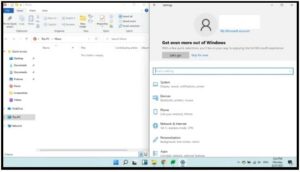
- Now you will see all the other apps and windows as thumbnails in the other half section. Simply click to select the desired windows to add it into the other half of the screen.
Ø Done!! Now you can see your current windows and other selected window on the same screen.
If you want to run and use three different apps at the same time on a single screen then you need to choose the 3rd Snap layout.
- Open the app windows that you want to use for split screen.
- Hover your mouse over the maximize button and it will show all the available split screen layouts.
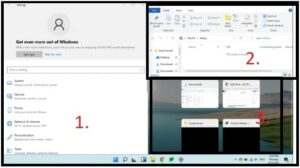
- Select the three parts layout as shown below.
- Now the current window will open automatically in the selected area. Similarly, choose the other windows to add as a split screen.
- Done!!
In a similar way, users can also use the four-screen layout to split screen in 4 parts. But remember, splitting a screen in three or four sections may affect the visibility and clarity of windows. So if you are going to split screen in more than 2 parts, we recommend using a large display.
Additional Information: Keyboard Shortcuts to Split Screen On Windows 11 PC
If you don’t want to use the drag option or snap layout feature to use split screen then use the keyboard shortcuts for quick actions. Before using the windows 11 Split screen keyboard shortcuts, make sure Snap windows feature is already enabled.
| Win Logo + Right Arrow | Move app window to right half of the screen |
| Win Logo + Left Arrow | Move app window to left half of the screen |
| Win Logo + Left Arrow + Up Arrow | Snap app windows to top left quadrant |
| Win Logo + Left Arrow + Down Arrow | Snap app windows to bottom left quadrant |
| Win Logo + Right Arrow + Up Arrow | Snap app windows to top right quadrant |
| Win Logo + Right Arrow + Down Arrow | Snap app windows to bottom right quadrant |
| Win Logo + Down Arrow | Minimize the window |
| Win Logo + Up Arrow | Maximize the window |
Method 03 Using Virtual Desktop
Virtual desktop configuration is another way to split your screen and use different apps simultaneously.
To use Virtual desktop for split screen in w11, follow the instructions below.
- At first, hover your mouse cursor over the “Task View” button and click the “new Desktop”.
- Open the apps that you want to keep in split screen sections.
- Now you can hover the mouse over the Task View button to access the desktop you need to work with.
So guys these are the best ways to achieve a split screen in the windows 11 OS. It’s important to know that Snap windows settings should be enabled on windows 11 to access the split screen function. Just because it’s a preinstalled feature for Windows OS users, you do not need to download and install third-party split screen software.
No doubt split screen functionality offers a good way to boost work efficiency but it may decrease the display’s visibility and clarity of windows. So if you are still interested in splitting the screen on windows 11 for better multitasking, try to work on a large screen.

