How To Downgrade Jio Phone And Stop Auto Update
Learn How To Downgrade Jio Phone And Stop Auto Update to install Omnisd app and other custom OS without Error
Today we are going to share latest method to downgrade Jio phones permanently. So that you can install a custom OS and Omnisd file without any issue. Before going to jump into the process, it’s important to know that developer options are not available in Jio QUALCOMM and SPD devices. For this, we need to enable developer options by using third party apps. After that, apply the commands to block auto update on jio phone.
Jio phone’s auto update blocking process is very easy and we can do it within a few minutes by applying the custom modifications. Read the tutorial properly, learn each and everything carefully and then apply it on your own device. This tutorial is really very important for those, who want to install Ominisd in Jip phones after update 2020. Without downgrading the software version of your mobile, there is no other solution to access Omnisd app services.
Why We Should Stop Automatic Software Update On Jio Devices
As we all know, in the past it was easy to add an Omnisd app in a Jio phone by flashing the Omnisd zip file. After that, users can download and install android apps on their Jio phones using the Omnisd app. Actually, the Jio phone doesn’t support android apps, but we can activate them in Jio phones with jio Omnisd app or file.
Because of this, recently Jio started updating their keypad devices with patched files to prevent their device from third party apps installation [OmniSD & Gerda OS ]. That means, once your device is updated to the latest version, you will not be able to install Omnisd on Jip phones. Similarly, if you try to downgrade the Jio software version with an older one, it will update again on the latest version because of Jio Auto Updater tool.
To fix this issue, we have to downgrade and block Jio auto update with advance trick. To perform this trick, we need to enable the developer option on Jio phone which is officially not available. But we will do it with another un-official third party apk. After that we have to run some adb commands to gain root access on Jio phone.
Requirements To Downgrade and Block Auto Update On Jio Phones
- Download Jio Downgrade files with tools. [ Downgrade files may be different for different Jio models. So always use the supportable firmware or flash file ].
- Enable Stuff Zip File For Jio Phones. [ This file is universal for all devices ]
- Adb commands to root and stop Auto update in Jio phones.
- Working USB cable with pc.
Method To Downgrade Jio Phone Software Permanently
If the device is already updated on the latest version then downgrade it by flashing jio downgrade flash file 2020. Most of the all Jio downgrade flash files come with flash tools. So, you no need to go anywhere to download Jio flash tool. If getting any issue, download the tool separately.
Step01 Preparation And Configuration
- Install USB drivers for your mobile [Qualcomm Or SPD ].
- Next, install “minimal adb & fastboot tool” on windows pc. This is important to run adb commands directly from pc to mobile.
- Extract the downloaded “Jio Downgrade flash file” on desktop.
- Check extracted “Jio Downgrade flash file folder” for Jio flash tool and run the QFIL tool as administrator. Otherwise, download QFIL or QPST tool latest version separately.
Step02 Downgrade Jio Software Using QFIl Tool
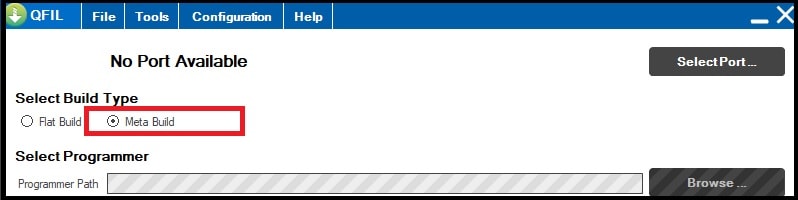
- Once the tool launched on your pc, select the “Meta Build” option from “select build type” section.
- Now click on the “Load Content” button from the “select build” section and browse the “contents” file from the extracted jio downgrade flash file folder.

- Come to the device, remove & re-insert battery for once and then connect the device with pc by pressing the Jio flash boot key. This boot key will boot your device into EDL mode which is necessary for Jio firmware flashing.
- If the device is properly connected with pc into EDL mode, you can see “Qualcomm HS-USB QDLoader 9008 port” on the top of the tool.

- Now click on the “Download” button from the tool to start the downgrading process. Here it may take a couple of minutes to flash new software.
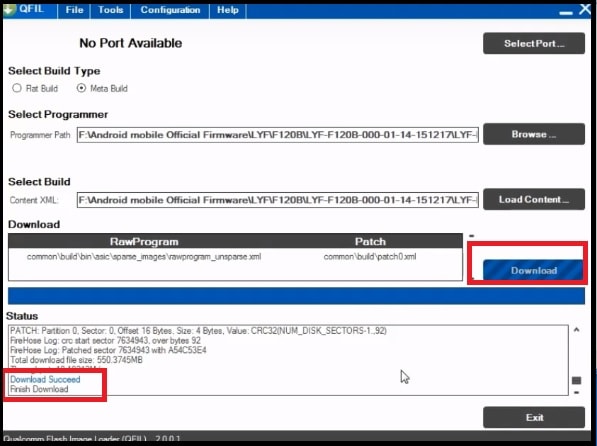
- End of the successful firmware flashing, unplug USB and reboot your device again.
- Done!!! Downgraded software has been installed on the Jio keypad mobile and now we can flash Omnisd file on Jio mobile.
Step03 Flash Omnisd On Jio Qualcomm Phone
After completing the downgrade process, we are free to flash Omnisd file without any issue. Tool will also same to flash Omnisd file on Jio LYF Qualcomm device.
Download OmniSD file for Jio Phones
- Extract the downloaded Jio LYF Ominsd firmware zip file on desktop.
- Use the already opened QFIL tool or launch the new QFIl tool as administrator.
- Once the tool opened, this time select the “Flat Build” option from “Select Build Type” section.

- Next, click on the “browser” button and load “prog_emmc_firehose_8909_ddr.mbn” from the OmniSd folder.

- Again, click on the “load XM” button and browse the “rawprogram_unsparse.xml” file from the extracted Omnisd flash file folder.

- Now the tool will open a new window in front of you. Select the “patch0.xml” file.

- Now remove & re-insert battery of your device and connect it with pc by holding the proper boot key. The device will boot into edl mode automatically.
- Once the device is connected with pc into edl mode, press the “Download” button directly from the tool. It will start flashing the Jio Omnisd file and take a couple of minutes for successful flashing.
- All done!!! Omnisd installed on your Jio Qualcomm phone and device will reboot automatically.
Step04 Install Enable Stuff App On Jio Mobile & Stop Auto Update
Omnisd has been installed after applying the above steps. Now it’s the time to download and install Enable Stuff App to enable Jio developer option. After that run the commands to disable auto update. This app installation will help you to block auto updates on Jio phone.
Enable Stuff File : DOWNLOAD / MIRROR
Commands.txt To Stop Auto Update : DOWNLOAD / MIRROR
- Download the Enable Stuff App zip file on pc.
- Move this file into SD card and then insert in your mobile or move it into your phone using Bluetooth.
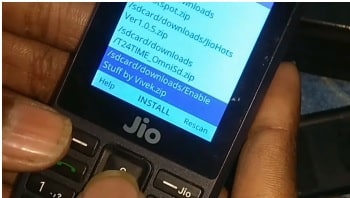
- Now open the OMNISD app on Jio phone, browse the Enable Stuff App zip file and install it.
- Once the Enable Stuff App is installed on your phone, open and then close it again. You don’t need to do anything.

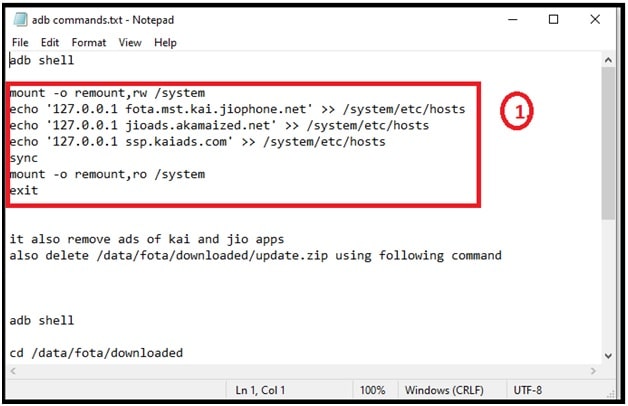
- Now open “adb commands.txt” file to get all commands in notepad file.

- Enable Developer option in Jio mobile – Open phone “settings” >> “Device” >> select “Developer” option.
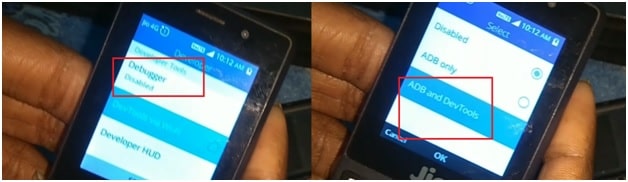
- Next, Select “Debugger” >>> “adb and DevTools” option >> press ok button.

- Now connect the device with pc, open command prompt and run the below command first.
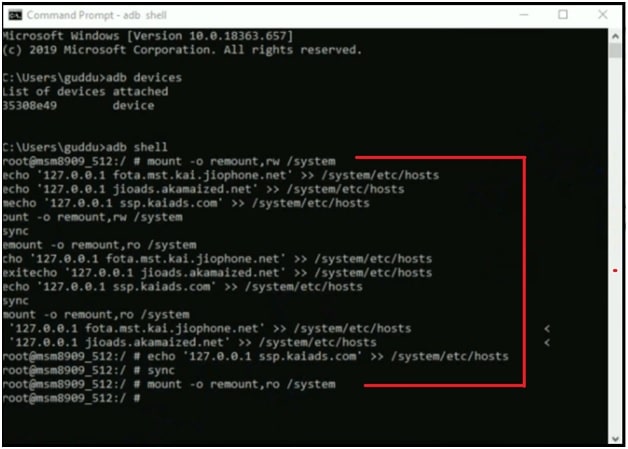
adb devices
- Again type the below command and execute it.
adb shell
- Next, copy the below commands and paste them into the command window by clicking right click.
- Again type the below single command and hit enter key.
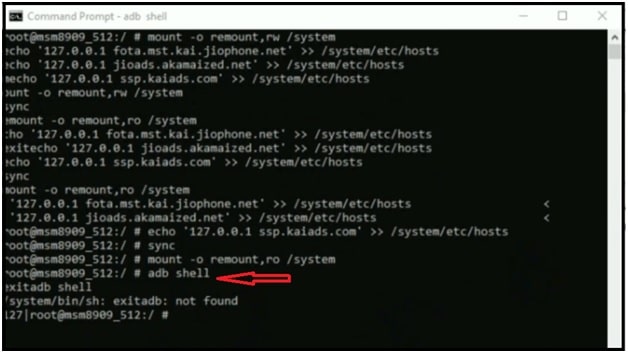
adb shell
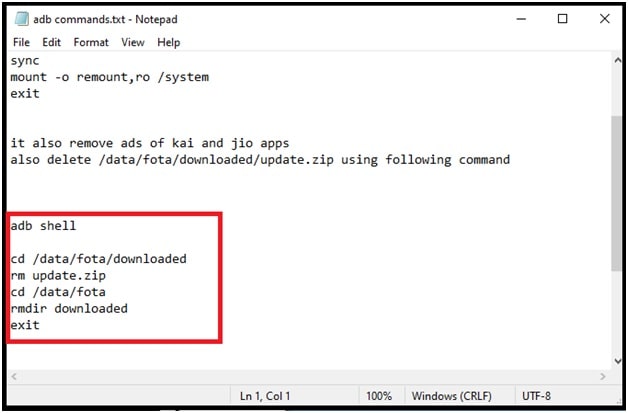
- Same as above step, copy the below commands and execute them.

- Now unplug device from pc, reboot the device to apply the modifications.
- All done!!! Auto update blocked and the device will not update to the latest version automatically. That means, you can enjoy omnisd files without any issue.
So guys this is all about how to stop auto update in Jio phone by enabling developer option and get root access. Some of you may see it difficult to perform but it’s really very easy if you are going to follow complete steps properly. Method is universal but Omnisd file and downgrade files are different for different Jio models.
Till now getting any issue in any step, please leave your comment below.