Windows 10 Reset DNS Cache : How To Flush dns windows 10 Pc
Methods For Windows 10 Reset DNS Cache : How To Flush dns windows 10 Pc
Whenever you got DNS issue problem or internet connection error or DNS cache corrupted at the time of surfing internet, may be you need to flush DNS cache in Windows 10. Most of the time, DNS cache reset will fix these issues automatically.
What IS DNS And How It Works To Browse Website
DNS is the automated service that converts or redirects the website URL name, into the IP address that is needed for actual communication.
Probably you may know that DNS covert the each and every site domain name into specific IP address so that computer can understand and find the correct address. It’s happen because of DNS or Domain name system feature of windows 10 OS.
Whenever you visit to any site with its domain name, the web browser of your pc initiates a request to internet, but this request cannot be completed until the site’s name is “converted” into an IP address [specific IP Address].
For this task, each and every window OS comes with built in intelligent feature which stores the specific DNS server address to boost & speed up browser experience. This function use the IP address and refers to this user-specified DNS service / gateway-specified service to resolve the domain name of a website to its IP address and load it in your web browser.
It’s also must to know that each and every internet service provider provides their own DNS server. Because of this, this DNS server is specified with connected router or automatically fetched from the internet service provider [ ISP ].
Actually it’s very deep subject to learn DNS or DNS server and how DNS works. So, here we are not going into deep discussion. It’s enough to know that whenever you open any website in your browser, your browser [chrome/firefox] refer this domain name to DNS server to get specific IP address of the website. Then, it redirect again to your website to open.
At the same time windows 10 stores all the DNS server address of the websites before browsing. Just because of this function, when you visit on same website again, it opens quickly. These DNS records make up the DNS Cache (Also called a DNS resolver cache).
C :\Windows>ping google.com
Pinging google.com [216.239.51.100] with 32 Bytes of data :
Reply from 216.239.51.100 : Bytes=32 time=267ms TTL=242
Reply from 216.239.51.100 : Bytes=32 time=261ms TTL=242
Reply from 216.239.51.100 : Bytes=32 time=256ms TTL=242
Reply from 216.239.51.100 : Bytes=32 time=252ms TTL=242
Ping statistics for 216.239.51.100 :
Packets : Sent = 4, Received = 4, Lost = 0 (0% loss),
Approximate round trip times in milli-seconds :
Minimum = 252ms, Maximum = 267ms, Average = 259ms
Here you can see 216.239.51.100 is google.com’s IP address, so now enter http://216.239.51.100/ into your web browser’s address or location box. If the website comes up, you’ve got a DNS problem.
READ MORE ARTICLES
Wireless Mouse Not Working In Windows 10
Check Graphics Card In Windows 10 [ Tutorial ]
Windows 10 Startup Folder Location : Access Startup Folder
Windows 10 Disk Management Tools
How The DNS Cache Flushing Helps You
Technically, reasons may be different to flush DNS cache in windows 10. Commonly we flush the DNS if websites aren’t resolving correctly on browser or your DNS cache system holding an incorrect address of the site.
Many times this error comes because your DNS cache on the local server may be broken or corrupted. Similarly, sometime it’s holding the bad address due to DNS Cache Poisoning and Spoofing. In that case, you need to clear DNS cache from windows 10 pc. After clearing the bad results, pc can communicate with the host website properly.
IP address of the site has been from changed from host but your pc stored the old ip address record, it may result in your computer not being able to reach the site. In this condition, you need to update new DNS record in windows 10 by flush the older DNS cache.
How to Reset the DNS Cache in Windows 10 / w7 / w8 – Flush dns windows 10
As we already told you, reasons may be different for different users to flush DNS resolver cache in Microsoft windows 10 and other OS. But if you are unable to browse any site on your browser or getting website not found error then follow the below instructions for DNS resolver cache flushing.
DNS flushing is command is very similar with display DNS command. For this we will use windows 10 DNS cache reset command “ipconfig /flushdns”.
Method 01 : Flush dns windows 10 Using Windows Command
- Select the “START” button and then type “cmd” to find the command prompt. Otherwise, type “CMD” in search for same.
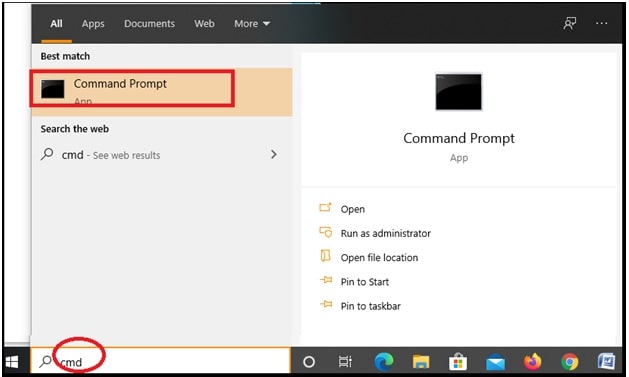
- Right click on “Command Prompt” option and run it as administrator.
- Once the command window opens on your pc, type the below DNS cache flushing command and hit enter key.
ipconfig /flushdns

- Done!!! Above DNS cache reset command or DNS flushing command will flush the DNS cache in windows 10 computer automatically.
Method02 : Reset DNS Cache Windows 10 Using PowerShell
This DNS cache flushing method is also same as above command window method.
- Open “PowerShell” from start or from “search box”.
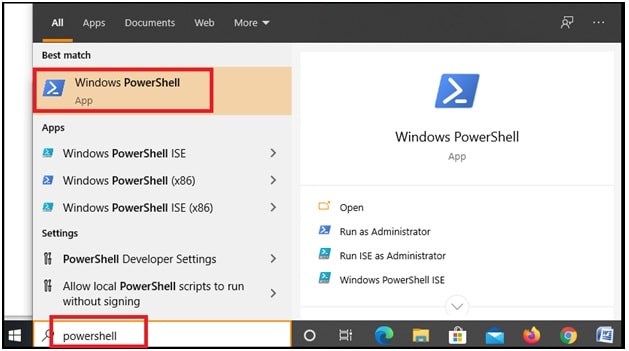
- Select “windows PowerShell” option and run it as administrator.
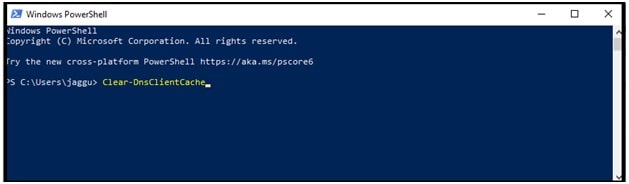
- Type the below windows PowerShell DNS cache deleting command and hit enter.
Clear-DnsClientCache
These are two working method to flush or delete DNS cache windows 10 pc using commands.
PLEASE NOTE : Both methods are universal for all Microsoft windows OS [Windows 10, 8, 7, XP, 2000, 2003 and 2008. ] .
Flush and reset a client resolver cache using the ipconfig command – Official Microsoft
Method To Check Current DNS Cache On Windows 10 PC
It’s very easy to check or find the current status of DNS cache on windows 10 computer including other OS [ w7/w8/wxp].
- Type cmd in search box and run the elevated command prompt window.
- Now type or paste the following command and hit enter key.
ipconfig /displaydns

- Above command will produce a very log output in command window.

For your convenience, Use the following command to open the dns.txt file created on your Desktop and inspects its entries.

In this way you can display or check DNS cache record of your windows pc.
Windows Command to display DNS Cache – ipconfig /displaydns
Command To Delete DNS Cache Windows 10 – ipconfig /flushdns
PowerShell Command To Reset / delete DNS Cache – Clear-DnsClientCache
This is all about DNS cache system and how it’s work including how to reset DNS cache on Windows 10 laptop/pc using commands? If you are unable to browse any website or website is showing “server DNS address could not be found” then delete the DNS cache from your local server. This process will help you to fix DNS website error.