How To Fix Google Chrome Status_Invalid_Image_Hash Error
Learn How To Fix Google Chrome Status Invalid Image Hash Error
In today’s guide we are going to talk about Status_Invalid_Image_Hash Error in Google Chrome and Microsoft Edge browser. Sometimes, suddenly you may see the “Aw, Snap! STATUS_INVALID_IMAGE_HASH” error due to configuration issue. Similarly, it may also accrue due to antivirus on your pc.
When this error appears on your browser, the web page can’t load the content. Problem is that “Aw, Snap!” errors do not leave much information about what is causing this issue.
If you try to observe, you will see error code : about Status_Invalid_Image_Hash while browsing the video streaming websites. This is a very common error and you can solve this issue by editing the windows registry editor and many other possible ways.
Pre-Requirements To Fix Invalid Image Hash Chrome Browser Error
- Restart your pc browser and check for error again. Many times, a simple reboot automatically fix the issue without doing anything.
- This error can be due to outdated versions of Chrome or Edge browser. So, make sure you have updated your browser on latest version.
Update Google Chrome Browser
- Open Chrome on your computer.
- Click on More (Three Dots) from the top right corner of the screen.
- Next go to “Help” section >>> “About Google Chrome”.
- Here you can see the new update for Google Chrome browser. Otherwise, it will show “Google Chrome is up to date” with the activated version.

Different Ways To Fix Error Code – Status_Invalid_Image_Hash
Most people use the Google chrome browser as their primary browser. It’s easy to manage for everyone for work or personal use. But another fact is that nothing is perfect in this world. It’s also the same with Google chrome browser. Sometimes, you may encounter errors in Chrome and error code : Status_Invalid_Image_Hash is one of them.
Here in this tutorial we are adding the best and working solutions to resolve Google chrome Status_Invalid_Image_Hash error. Checkout all the solutions one by one and learn how to fix it within a few minutes.
- Method 01 Disable Antivirus And Extension
- Method 02 Run Chrome in compatibility mode
- Method 03 Clear Cache In Chrome Browse
- Method 04 Run the –no-sandbox command
- Method 05 Disable RendererCodeIntegrity
- Method 06 Rename Chrome Application
Start with the first solution and then go for next advanced methods.
Method 01 Disable Antivirus And Extension

Sometimes, existing extensions or antivirus can be a reason for image hash error. For this, disable all the installed Google Chrome extensions first. Now check for Status Invalid Image Hash error in Chrome browser. If the solution worked for you, re-enable all the extensions one by one to find out the culprit. Once you are able to find the extension, remove it from browse and then install the alternative extension.
Same as extension, this error may appear due to your pc antivirus. Don’t forget to check the antivirus compatibility with browse and then check for error by disabling it for movement.
Method 02 Run Chrome in compatibility mode
You can also try to fix error code Status Invalid Image Hash in Chrome browser by loading it into compatible mode.
- Close the opened Google Chrome browser of pc.
- Now look for the Google Chrome browser icon on your desktop.
- Right-click on the icon and select the “properties” option from the list.

- Navigate to the Compatibility tab >> check mark on “Run this program in compatibility mode” under the Compatibility mode section >>> select Windows 8 from drop down list.
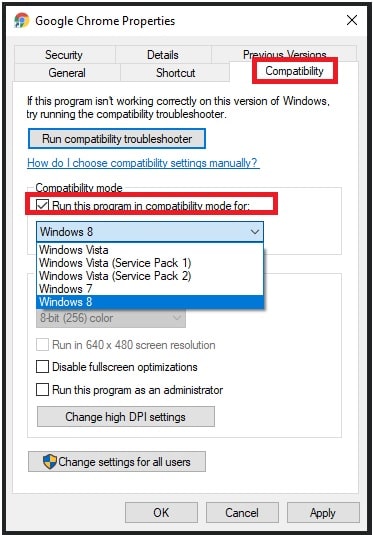
- Finally, click on the “Change settings for all users” option and then click on the “Apply” button.
- Now launch the Chrome browser to check the result.
Method 03 Clear Cache In Chrome Browse
Each and every time when you browse any site on your browser, it stores some files in the form of caches & cookies. Sometimes, Chrome caches & cookies files might also trigger the status_invalid_image_hash error. For this, we can clear cache on Chrome browser.
GUIDE :How To Clear Cache On Chrome Browser
Method 04 Run the –no-sandbox command
Note: Disabling the chrome sandbox is helpful to remove Status Invalid Image Hash error for Chrome browser. But remember, this action might potentially make your browser vulnerable.
- Close the chrome browser. Skip the step. If already disabled.
- Next, right-click the Google Chrome browser icon from desktop >>> Select “Properties” >> Navigate to the “Shortcut” tab.
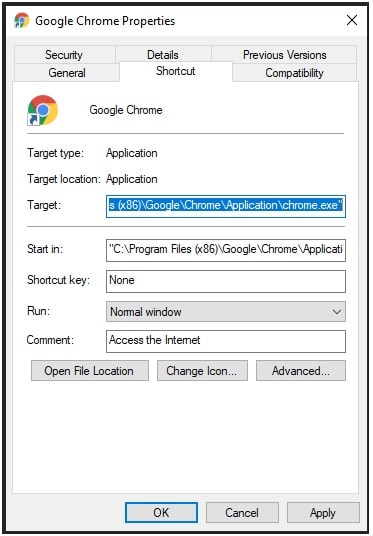
- Find the “Target” option >>> go to the end of the entry >> Add a space and type –no-sandbox after the .exe
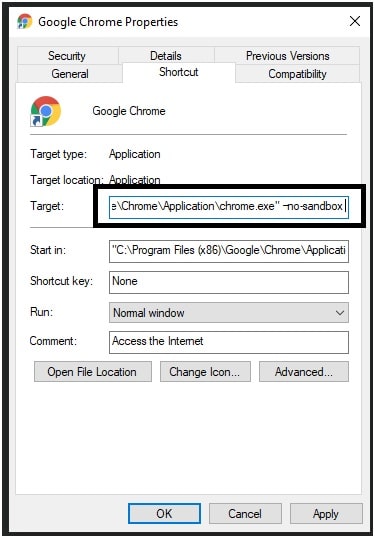
- Click on the “Apply” button to save the modification and then open your Google Chrome again.
Method 05 Disable RendererCodeIntegrity
Security and privacy are most important in the internet world. Because of this windows 10 OS offers several security features to make their platform more secure. Same as other features, Windows 10 OS implemented RendererCodeIntegrity feature to block suspicious or unsigned code from interfering with the browser’s page rendering processes. Moreover, it changes the way Chrome loads the web pages you’re visiting.
Sometimes, this RendererCodeIntegrity feature could trigger the “error code – Status_Invalid_Image_Hash” and stop browsing the web page. To fix this issue, you can disable the RendererCodeIntegrity from registry editor or using command prompt.
(A) Disable RendererCodeIntegrity Using Windows Registry Editor
Please Note : Group policy editor doesn’t come in Windows 10 Home edition. It’s only for pro versions of windows OS. If you are unbale to run “Registry Editor or Group Policy Editor” or it’s not available in your OS then install Group Policy Editor in windows 10 manually.
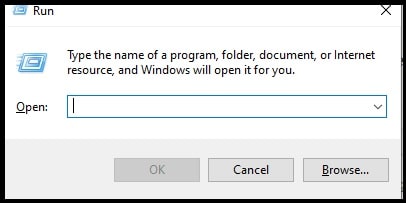
- Open windows Run dialog box (press Windows logo key + R).
- Type regedit and click enter key to open “Registry Editor or Group Policy Editor”.
- Follow the below path in “group policy editor”.
HKEY_LOCAL_MACHINE\SOFTWARE\Policies\Google\Chrome.
Please Note: If the Chrome folder does not exist in the registry editor then you need to create it first.
Once you are into the “policies” folder, it should contain a folder titled “Google”. But if the Google folder is not listed under the policy folder then create the “Google” and then “Chrome” folders manually.
Create Google Chrome Folder Under The Policy Folder (registry editor)
- Once you are into the “Policy” folder and it’s not containing the “Google” & “Chrome” folder as shown below.
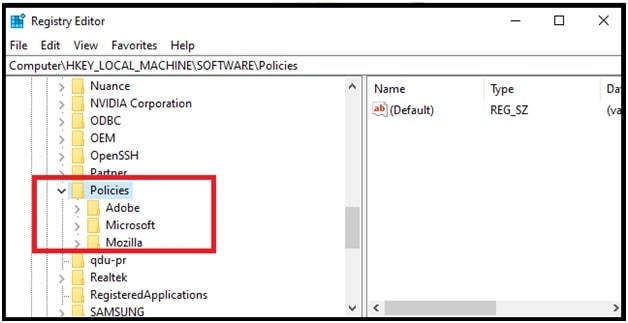
- Then you have to create it yourself. Make sure you are doing it very carefully. Otherwise, one wrong step may crash your system immediately.
- Open “run dialog box” by pressing “windows logo key + R”.
- Type regedit command and hit enter to launch windows registry editor.

- Follow the below path
Navigate to “HKEY_LOCAL_MACHINE” > “SOFTWARE” > “Policies”
- Once you are into the polity section, right click on “policies” folder >>> click on “new” >> then “key”.
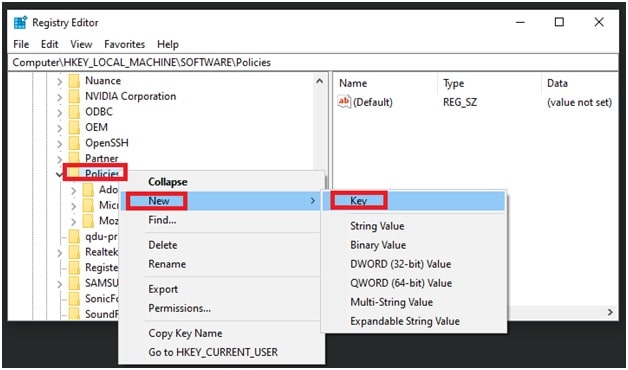
- Above action will create a new folder as “New key #1”. Again right click on “New key #1” folder >>> select the “Rename” option and type “Google”.

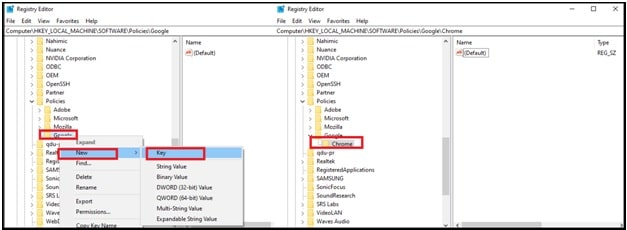
- Now open the newly created “Google” folder and it should contain a folder titled “Chrome”. If not then create a new folder as “Chrome”.
- For this, right click on “Google” folder >> click on “new” >> then “key”. It will also create a new folder as “New Key # 1”. Again right click on ““New Key # 1” folder >> select “rename” and type “chrome” and it will rename as “Chrome”.
- Done!!!
- Next, Right-click on the “Chrome” and select “New” >>> then select the “DWORD 32-bit value” option from the list.
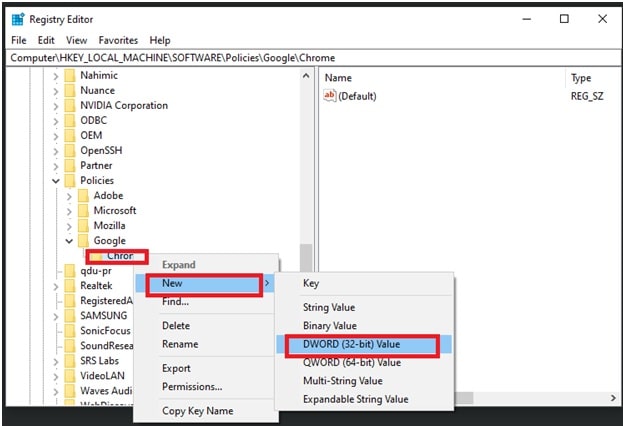
- Now you will see a “new value #1” entry in the main window of the registry editor. Right click on it and rename it as “RendererCodeIntegrityEnabled”.
- Again, double-click on “RendererCodeIntegrityEnabled”. A new box (Edit DWORD (32-bit) Value ) will appear in front of you. Here you need to set the value data to “0”.
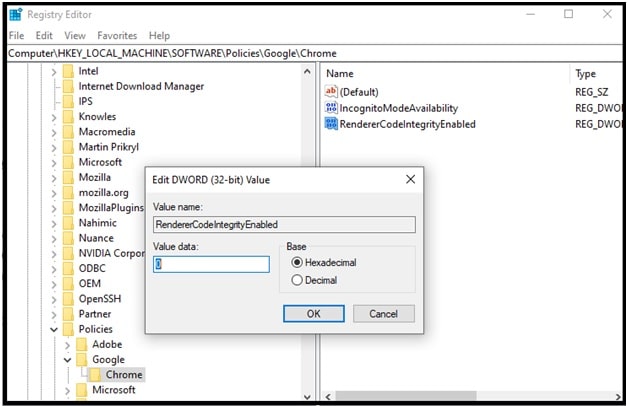
7.Close the window and reboot your pc to apply the modifications.
If you are not sure to apply the modification from the registry editor, follow the below Command Prompt method to disable the RendererCodeIntegrityEnabled feature in w10.
(B) Disable RendererCodeIntegrityEnabled using Command Prompt
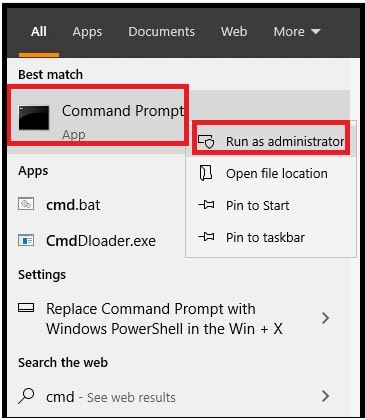
- Open the command prompt as administrator.
- Type the following command and execute it by entering the enter key.
REG ADD “HKLM\Software\Policies\Google\Chrome” /v RendererCodeIntegrityEnabled /t REG_DWORD /d 0
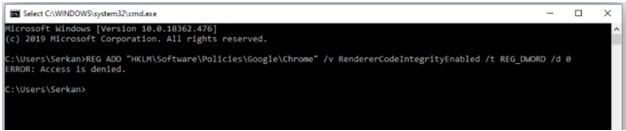
- Close the window, reboot your pc and launch the Chrome browser again to check if the error persists.
Method 06 Rename Chrome Application
- Open the File Explorer on pc.
- Next open the Chrome application folder by following below path
C:\Program Files (x86)\Google\Chrome\Applicationchrome application folder
- Right-click on the Chrome app and rename it to newbrowserapp
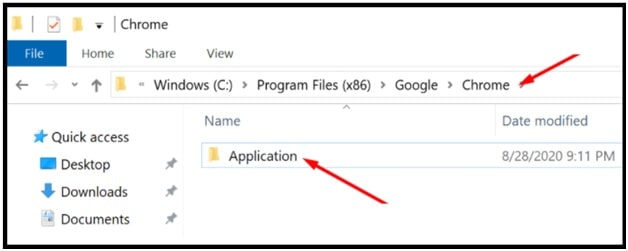
- Launch Chrome again.
These are some advanced and basic solutions to resolve status_invalid_image_hash error. All the solutions are suggested by advanced developers and active users. Try to apply all the above solutions one by one and browse your website without invalid image hash error.