How To Enable Or Disable Delete Confirmation Dialog In Windows 10
Three Different Methods For How To Enable Or Disable Delete Confirmation Dialog In Windows 10
Do you know we can easily disable or enable delete confirmation Dialog in windows 10 OS? If not then this guide is for you. Here in this tutorial, you can find three different ways to enable or disable delete Confirmation dialog message In Windows 10 pc/laptop.
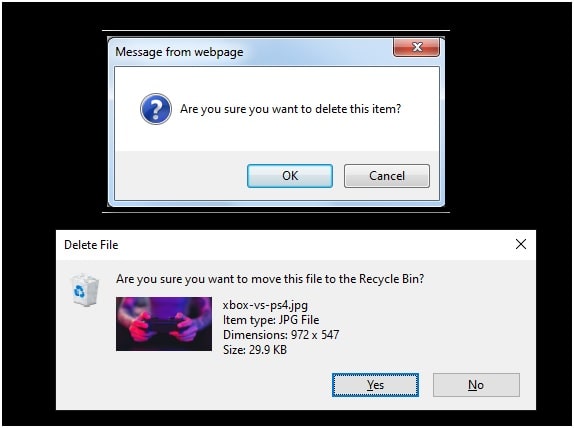
Each and every time when you try to delete any file from your system, a pop-up dialog box appears on the screen to confirm your action. But do you know, we can customize this default “are you sure you want to delete this item” or “Are you sure you want to move this file to the recycle bin” dialog window according to our own choice. In this guide we learn how it’s easy to change the confirm dialog (data-confirm) box which comes on click of delete button.
Example of Delete file confirmation dialog message
By default, Microsoft disabled this delete confirmation message In Windows 10 OS. If by chance or accidently, the user clicks on the delete option or presses the delete button, the file or folder will directly move to the Recycle Bin.
In case, “don’t move to the recycle bin” windows 10 feature is enabled in your pc, the system will permanently delete the selected files without sending them to the recycle bin box. So, it is recommended to enable the “Delete Confirmation Dialog” box feature in your windows 10 laptop or computer.
So, if you want you can enable it within one click. Similarly, if you don’t want to see this delete confirmation dialog box at the time of deleting files then disable it.
Nowadays most of all users use the windows 10 operating software based pc and laptop because of good performance, stability, visual elements, additional bunch of features. But as we all know nothing is perfect in this world. Similarly, some of the changes in windows 10 aren’t that useful for some Windows 10 users. In the previous versions of Windows OS, a delete confirmation dialog message appeared but unfortunately, it’s no more since the release of Windows 8. According to Google search engine queries, some users found this delete confirm dialog (data-confirm) window very useful. So, if you are also one of them who are missing this feature and want this feature back in your pc, you can follow this guide to learn how to enable or disable the delete confirmation dialog box for Recycle bin on Windows 10?
How to Enable or Disable Delete Confirmation Dialog In Windows 10?
If you don’t want to take a risk of deleting important files/folders on windows 10 pc, the delete confirmation prompt will ensure you to confirm your action again. In short, after enabling this feature on your personal or professional pc, you can minimize the accidental removal process.
Let’s see how to disable or enable default delete confirmation dialog warning messages in windows 10 pc.
Method01 Using Recycle Bin
Users can find the windows 10 confirmation dialog box enabling and disabling option under the Recycle bin properties section.
For this method, the recycle bin shortcut should present on the desktop. Otherwise, create the new recycle bin shortcut on desktop by following the below instructions.
(a) Create Recycle Bin Shortcut
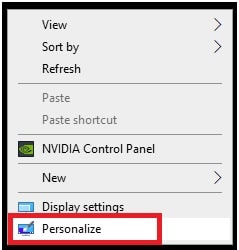
- Simply right-click on the desktop screen (blank area) >>> Click on “Personalize” option from the list.
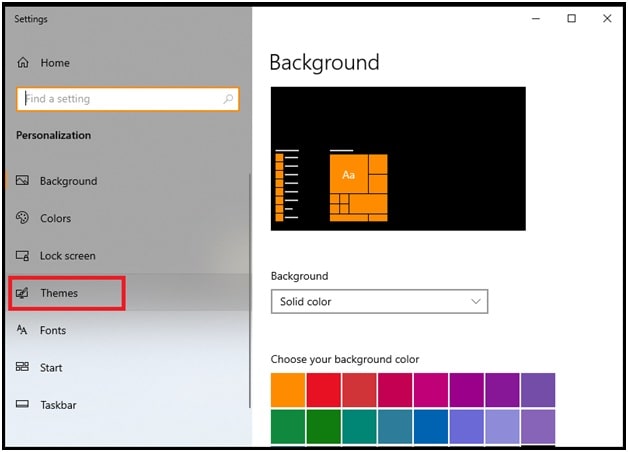
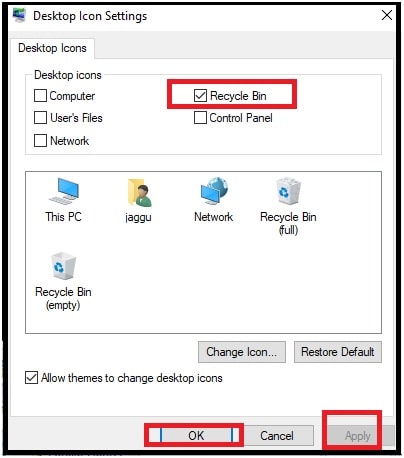
- Next, click on “Themes” option from the left pane >>> scroll down the screen and click on “Desktop icon settings” from the “Related Settings” section.
![]()
- Tick mark on the ‘Recycle Bin’ checkbox >> > then Hit the “Apply” button and then ‘OK’ to save modification.
- Now you will see the “Recycle Icon” on your desktop.
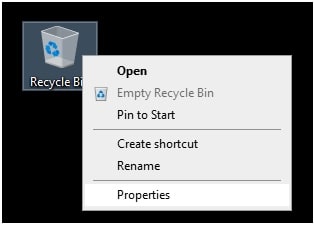
(b) Enable Or Disable Delete Confirmation Dialog In Windows 10 From Recycle Bin
- Again, right-click on the “Recycle Bin” icon from the desktop shortcut >> > Select “Properties” option and it will open a recycle bin properties window in front of you.
- Next, select the “Display delete confirmation dialog” by clicking in checkbox >>> Then hit ‘Apply’ to proceed and then ‘OK’ to save changes.
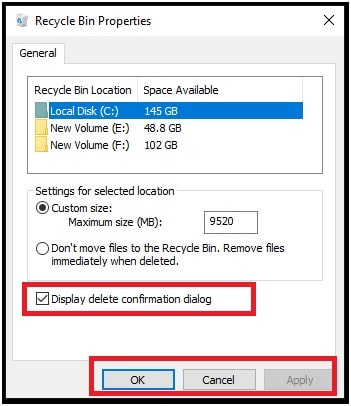
- Done. Now, whenever you delete any file or folder from your PC, a delete confirmation dialog window will appear on the screen to confirm the action. So, you can choose ‘Yes’ or ‘No’ accordingly. Similarly, if you don’t want to continue this option, repeat the same steps and uncheck the “Display delete confirmation dialog” option again.
Method02 Using Registry Editor
If you want to learn an advanced method then use the Registry Editor of windows 10 to disable and enable delete confirm dialog box.
- Run the dialog box from the start menu or press “Windows + R” keys from your keyboard to open the dialog box.
- Now, type regedit in the dialog box and press “Enter” key to open up the Registry Editor window 10.
- If prompted by the UAC, click on ‘Yes’ to proceed.
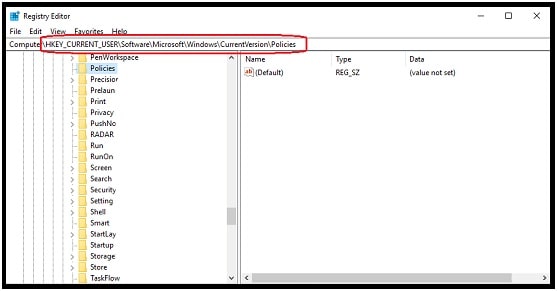
- Now, follow the below path carefully.
HKEY_CURRENT_USER\Software\Microsoft\Windows\CurrentVersion\Policies\Explorer
- Once you are in the above location, right-click on the blank area and select New >>> DWORD.

- Now click on the New >>> Select DWORD (32-bit) Value >>> give the name as ConfirmFileDelete.
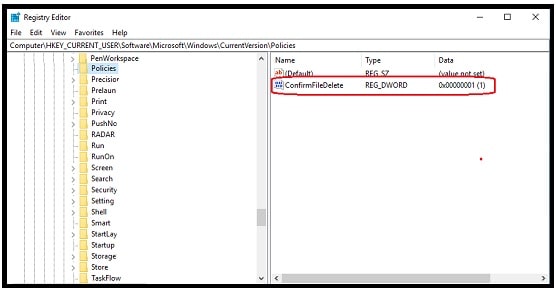
- Next, double-click on the ConfirmFileDelete value >>> Change the value data to 1 and hit OK.
- Done!! close all windows and restart your pc again to apply the changes.
Method 03 Using Local Group Policy Editor [ For Other Windows Edition ]
If you are running Windows 10 Pro/Mobile/Enterprise edition then use the windows 10 local group policy editor for the same purpose.
- Same as above, open the dialog box by Pressing the Windows + R keys on your keyboard.
- Type gpedit.msc command to open up the Local Group Policy Editor windows 10.
- Now navigate to the following settings from the User Configuration category.
User Configuration\Administrative Templates\Windows Components\File Explorer
- Just double-click on the “Display confirmation dialog when deleting files” settings option.
- Now a new window will open and select Not Configured to Enabled.
- Done!! Click on the Apply button and then OK to save changes.
Revert the process by selecting the Not Configured or Disabled from the option, if you don’t want to see this delete confirm dialog box on windows 10 pc.
This is all about how to enable or disable delete confirmation Dialog in windows 10 OS [32 Bit & 64 Bit]. All the methods are 100 working and tested for all windows 10 OS. But here we recommend you to apply the method 01 which is much easier for everyone. Registry editor process is case sensitive and one single wrong step may crash your window OS. So, we highly recommend you to go with recycle bin delete confirmation dialog windows 10 method.