How To Enable Auto login In windows 10 – Windows Auto Login
3 Different Methods To Enable Auto login In windows 10 pc – Windows Auto Login
Do you want to bypass the login prompt or login screen on windows 10 whenever you start your pc? If yes then you have to setup auto login in windows 10 pc or laptop. After enabling the automatically log-in feature Into Microsoft Windows 10, it will not ask you to enter the security lock PIN.
Microsoft always tries to implement new features and services with their working Operating systems. Auto login into windows 10 is one of them. Officially this feature was introduced in Windows 8 OS and still remains in the Windows 10.
Just because, windows 10 auto login is an official built-in feature to bypass windows login screen. So you no need to use any third party auto login tools or software. Users can do it by modifying the system registry. Best thing is that the process is the same for other windows OS like windows 7 & window 8.
Actually, the reasons for enabling automatic sign in Windows 10 without entering the security PIN may be different for different users. if you try to search on the internet for the same topic, several users are asking “how do I make windows auto login or to turn on automatic logon in windows 10 PCs?”
So, if you are interested in setting up Windows 10 auto login without PIN then this guide is for you. Once again we are telling you, it may be risky if you are using your pc or laptop in the public domain. Enable auto login function if you find that PIN is not fast enough and you are the sole owner of your pc.
Last time, we published a post on “How To Login as Administrator In windows 10 Pc” and now how to turn on automatic signin windows 10 pc/laptop? So, let’s see how to enable automatic log in function in windows 10 to bypass the login prompt?
Official Methods – Windows 10 Auto Login Setup And Configuration

As we already said, Microsoft officially allows you to enable or turn on this feature. Additionally, you can also try the third party w10 auto login tools. Because of the security reasons, it’s not advisable to use unofficial tools or software.
Method01 Enable Automatically Sign into Windows 10 From User Account
- Press & Hold the Windows Key and press “R” to open the Run dialog box.
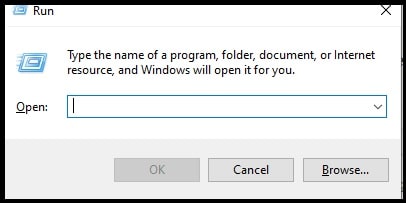
- Type “control userpasswords2” or “netplwiz” in the run dialog box (without quotes), then select “OK“.
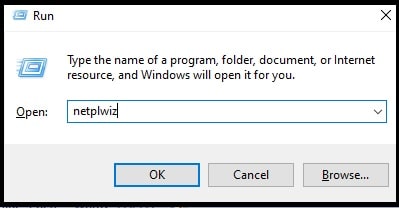
- After applying the above step, the “User Accounts” box will appear in front of you.
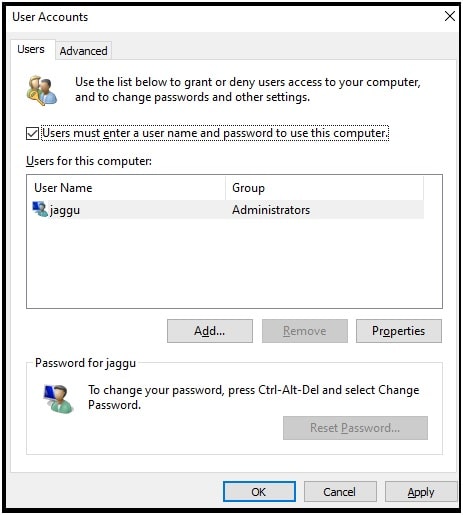
- Just uncheck the “Users must enter a user name and password to use this computer.” Option >> click on “apply” when you’re done. [ Select the user account, if already not selected ]
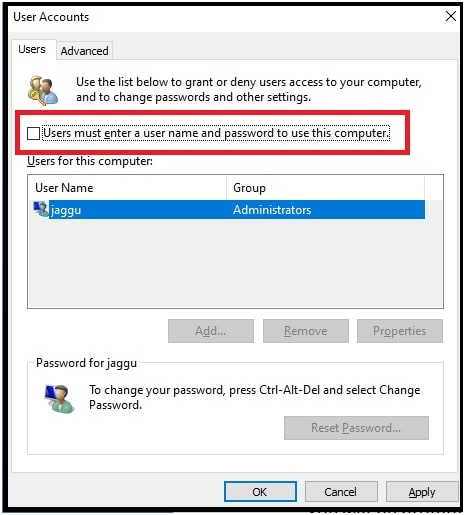
- Now a small window will prompt (Automatically Sign in) to enter the username and password for the account you wish to use automatically when Windows starts. Type the password in both sections and then select “OK“.
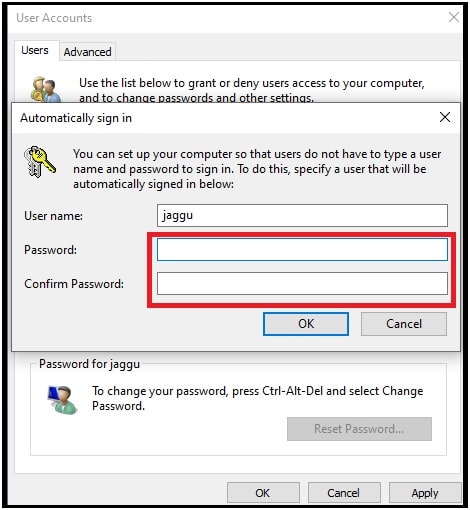
- All done!!! Automatic login setup completed on windows 10. Now the next time you start your Windows 10 computer, it will automatically login using the selected account.
Method02 Enable Auto Login In windows 10 PC Using Settings Menu
This is an easiest way to add an auto login function in a Windows 10 PC that will boot OS without asking the login credentials.
- Go start menu >>>> open “Settings” section >>> select “Accounts”
- Navigate to “Sign-in options” from left section >>> click “Require sign-in” >>> Set it to Never
- Go the PIN section >>> Click on the Remove button
- Done!!!
Method 03 Setup Windows 10 Auto Login Using Registry
We can also apply the automatic logon functionality on windows 10 by editing the windows 10 registry. But before going to use this method, it’s necessary to know that editing your registry is quite risky and it may cause your system to fall.
- Press and hold windows key + r to open windows dialog box and then type ‘regedit.exe’ (without quotes) into the Run box and then click ok.
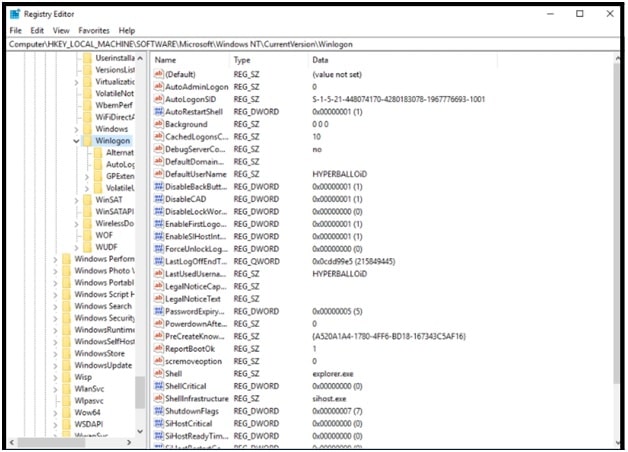
- Once the registry editor opens, Locate the key HKEY_LOCAL_MACHINE\SOFTWARE\Microsoft\Windows NT\CurrentVersion\Winlogon
- Find and navigate to the entry named “DefaultUserName” Double click on it.
- Edit String >> find your account name in the Data value box.
- Next search for the DefaultPassword entry >>> If you cannot find it, you should create such an entry
- Now simply right-click on the empty space >>> New >>> String Value >>> Name it DefaultPassword >>> Go to the Value data box and enter your password >>> Click OK to apply the changes.
- Find the AutoAdminLogon >>> Change the value from 0 to 1 >>> Click OK
- Done!!! Reboot your PC to see if automatic logon has been successfully enabled.
These are three official methods to make Microsoft Windows 10 computers automatically login and bypass the login prompt at the time of OS boot. All the methods are 100% working and tested but we never suggest you apply these changes using a registry editor. It’s a little bit complicated for newbie users.