Fix TWRP Error 7 – Updater Process Ended With Error 7 In TWRP
Fix TWRP Error 7 – Updater Process Ended With Error 7 In TWRP
Are you trying to flash custom ROM on your rooted android device with TWRP recovery but it’s showing updater process ended with error 7 in TWRP recovery? If yes that means you are unable to install custom ROM on your device because of TWRP error 7. The ROM’s updater script file called “Asserts” is a safety mechanism which is responsible for this “error 7” code. In this post we will explain reason of error code 7 in TWRP with solution.
Read the post if you are new and want to learn more about Error 7 in TWRP recovery and how to fix TWRP error: 7 [updater process ended with error 7] safely?
As we all know android is an open source OS which allows user to customize and modify the device by TWRP recovery and root access. With the help of rooted mobile, we can use root apps, mods and custom ROMs to experience unofficial OS easily. Actually, all these customizations are not allowed with restricted stock ROM.
Similarly, TWRP/CWM recovery is another important part of rooted devices to flash custom ROMs, custom zip files and root packages [SuperSu & Magisk ]. TeamWin Recovery Project also known as TWRP recovery which is a fully touch-based custom recovery. In the starting of custom recoveries development, TWRP was developed for Nexus devices. But now it’s available for countless other android devices in form of both official and un-official third-party builds.
Now we are in 2020 and many things have been changed because of development. That’s why we can also root android devices without TWRP recovery. Yes, now you no need to wait for an official or unofficial TWRP build for your own device. Simply create patched boot image using Magisk file and then flash it via fastboot command to root your mobile.
But some of you want to root their device to install new custom ROMs to experience new ROMs features. For this, TWRP recovery is necessary. Otherwise, there is no any other option for you to flash custom OS. But main problem is that sometime you may see TWRP Error 7 due to updater script called “Asserts”.
Now read the below section to understand the reasons of error code 7 in TWRP custom recovery. So that you can fix Error 7 in TWRP easily.
ScreenShot Of Error 7 Code In Custom TWRP Recovery

Reason Of Error 7 In TWRP Recovery
Most of the time users encounter “error 7” at the time of flashing new custom ROM through the TWRP recovery. Main reason of this error is updater script file called “Asserts” which is safety mechanism.
At the time of flashing custom ROM on android device, It checks the phone’s model number, version and the custom Rom version by the system variable ro.build.fingerprint getting from the Recovery.
If the inserted codes are matched with device, it permits the flashing process without warning. Otherwise, it prohibits the installation and you see error 7 – updater process ended with error: 7 in red color. This safely checks feature helps users to stop unsupported custom ROms on the device.
Here we can summaries the reason of error 7 in below points.
Status Error 7 arises in TWRP Recovery when
- The ROM’s updater script file does not contain a model of your phone,
- Or, if the phone model is presented but the script is created for other phone model,
- Or, for running in other providers’ networks.
Now the question is, how to fix error 7 code in TWRP recovery to flash custom ROM without error?
How To Solve TWRP Error 7 : updater process ended with error:7
To fix this issue, you have to check the correctness of the selected script which you are going to flash on your mobile. First off all make sure it’s compatible and specially designed for your device model.
Till now error 7 is coming after flashing the custom ROM file then apply the below steps. For this you need to apply some changes in custom ROM file manually. Don’t worry it’s safe and easy for everyone.
- First all extract the downloaded custom ROM zip file using any unzip software on your desktop.
- Eater into extracted custom ROms folder >>> find “META-INF” folder >> “com” folder” >> “Google” folder >> “android” folder. In the last you will see two files called “update-binary” & “updater-script”. Just right click on “updater-script” file and open it with any text editor for editing.
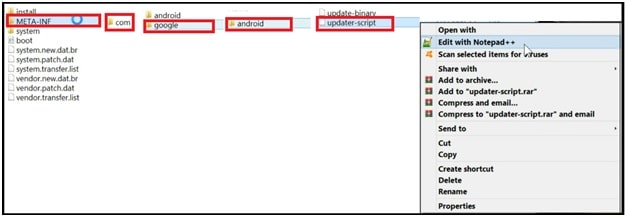
- Now this type of file will appear in front of you.
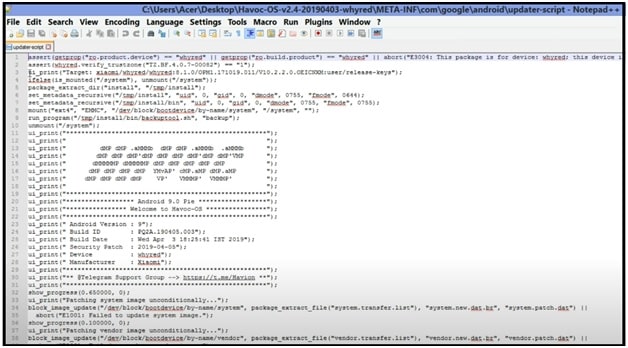
- Now find the line starting with “assert” and remove it completely. Usually it is the first or a few first lines in the beginning of the text file;

After Modification…………….

- Now save the modified file by pressing Ctrl + s key from keyboard.
- Next, delete the old zipROM package file and zip the file again with new modified file and move it into your phone storage.
- Reboot your device into twrp recovery and apply the custom ROM flashing process. This time it will no show error code 7.
- Done!!!
We successfully tested this error code 7 removal process on Redmi note 5 android mobile. It’s 100% working and tested method to install custom ROM without error 7 or updater process ended with error 7.
Custom ROM’s “updater-script” may be different for different devices. But you need to delete or remove existing line starting with “assert” in text editor software.
This is all about “Error 7 in TWRP recovery solution” and “how to remove error 7 TWRP while flashing custom ROM?” Simply apply the modification properly and flash custom ROM on android mobile without error code 7.