How To Root Nokia 3 Without Risk & Install TWRP Recovery
How To Root Nokia 3 Without Risk & Install TWRP Recovery – Are you using Nokia 3 and now want root Nokia 3 without dead risk then you have landed on the right place. Here in this post you will see how it’s easy to root Nokia 3 and how to install twrp recovery on Nokia 3 android Smartphone? No need to root your device if you only want to install TWRP recovery but TWRP recovery is must for Nokia 3 to flash a supersu root file and after then you can get full root access on your own Nokia 3 mobile.
As we all know Nokia made a comeback in the Android Smartphone market during this year. Before that Nokia was trying to find a market for windows OS smartphones like Nokia Lumia. But now in 2017 Nokia came back with Nokia 3, 5 and 6 with android operating system. Now Nokia is ready to compete in the market again. Nokia lovers can buy Nokia 3, Nokia 5 and Nokia 6 on amazon flash sale.
UPDATE NEWS: Nokia 3 Oreo Update Starts Rolling Out
Ok now if you are an advanced android user and want to customize your device in your own way just like an android developer then rooting is the perfect solution for you. If you have more customization options or want to upgrade your android device on the latest android version then unlock the bootloader of your device to write system files, install custom recovery [CWM/TWRP] and in the last root your device for modifications and customizations.
Other Interesting Posts For Rooted Android phones
- Hack Wifi password without root in android phone?
- How to move whatsapp on SD card?
- Learn How to change IMEI number?
- Enable OTG support on any android phone
- Learn How to increase RAM?
- How to increase internal storage?
Other Related Posts
- How to unlock Bootloader of Xaiomi Android Phone?
- Download Xaiomi USB drivers For Pc?
- Free Download Xaiomi Flash Tool
- Bypass MI account verification using MI account unlock tool.
How To Root Nokia 3 & Install TWRP Recovery
In order to root Nokia 3 Smartphone, you have to follow the three major steps and then get full root access on Nokia 3 mobile as shown below.
[a] Unlock bootloader on Nokia 3 [b] Install TWRP recovery on Nokia 3 [C} flash latest supersu root file on Nokia 3Now follow all above three points one by to get root access on Nokia 3.
[a] Unlock bootloader on Nokia 3
Bootloader unlocking is the first step in order to root Nokia 3 Smartphone. After unlocking the bootloader on Nokia 3 you can write system files of your device and then can’t flash twrp recovery in the place of stock recovery. For this, go through the link below and unlock the bootloader of Nokia 3 and then proceed for the next step.
[b] Install TWRP recovery on Nokia 3
Twrp recovery installation is the second step. Here we have to install custom twrp recovery on Nokia 3 mobile and after that we can flash any zip firmware on any device. Otherwise Stock recovery never allows you to perform these types of tasks. So, install TWRP recovery in the place of stock recovery.
Step01 Pre-Requirements
- Take backup of your phone data like messages, contacts, photos & videos.
- Charge your phone approx 60%
- Data cable or USB cable to connect your phone with pc.
Step02 Download And Installation
- install Minimal ADB fastboot Tool on pc [15 second process]
- Download and install Nokia 3 USB Drivers on pc
- Get TWRP recovery for Nokia 3 [rename it as recovery.img]
- Download supersu root file for Nokia 3
Step03 Enable Usb Debugging On Nokia 3
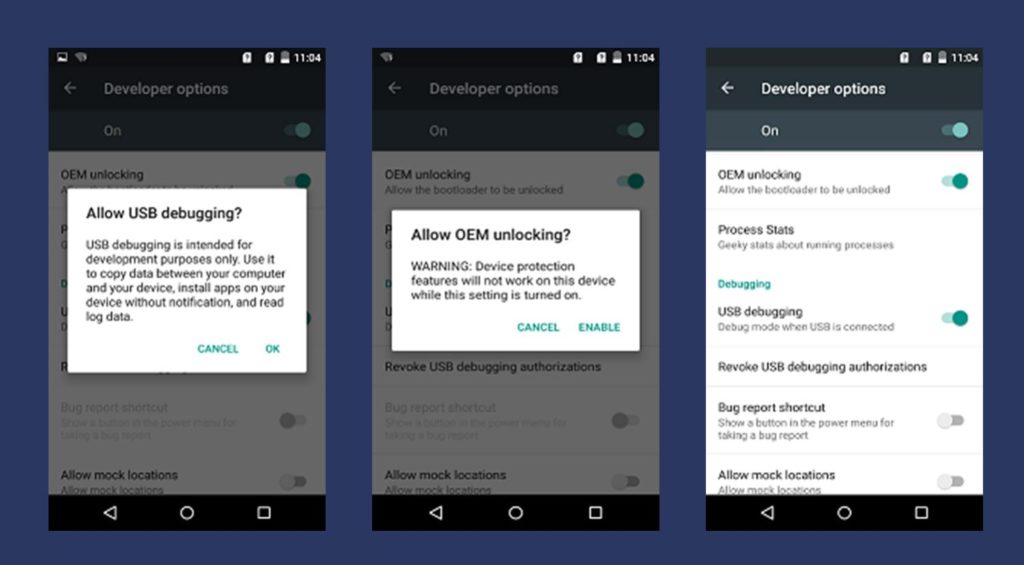
- To enable the developer option go to your phone setting>> About phone.
- Tab on build number option for 7 times .now you will get the message “you are now a developer”.
- Go back again and enter into the “developer”
- Now find the “USB debugging” option and enable it.
- Same as you will see the “OEM” option then enable it.
Step04
Steps to install TWRP recovery On Nokia 3
- Make sure usb drivers are installed on pc.
- USB debugging should be enabled on your device.
- Make sure the Minimal ADB and Fastboot tool is installed on pc.
- Now open the Minimal ADB and fastboot tool folder on pc

- Now download the TWRP file from above link and place it into the folder where ADB installed and rename it as reovery.img

- Next, click on any blank area in ADB folder and then Press and hold Shift Key +Right click and select “open command window here”

- Boot Nokia 3 Into Fastboot Mode
Boot Nokia3 Into Fastboot Mode By Command – Connect the phone with pc via USB cable and enter the below command to boot it into fastboot mode.
adb reboot recovery
OR
[Command will reboot your device into recovery mode]adb reboot bootloader

- Now you will see the below type of screen on your device.

- Use volume key to scroll and navigate to “Reboot to Bootloader” option and select it by Power key.
- Now your device will boot into bootloader/fastboot mode and you will see some test on your screen that would say: Fastboot Mode.

- Again go to command window and type the below coomand to check fastboot mode.
[Command will show all attached fastboot device]Fastboot devices

- Now again type the below command to flash twrp recovery on Nokia 3 and hit enter button.
[Make sure twrp recovery [ recovery.img] is already placed into the adb folder]fastboot flash recovery recovery.img

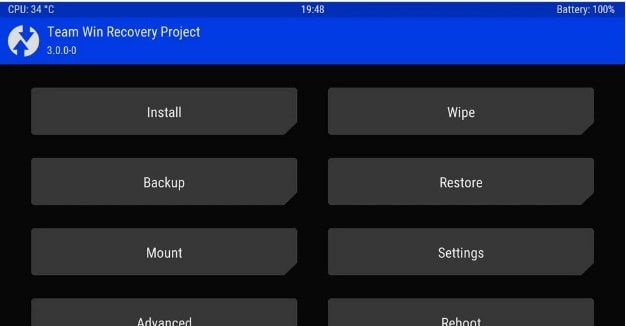
- After completing the above process, now type the below command to boot it into recovery mode.
[Command will boot your device into newly installed TWRP recovery]fastboot boot recovery.img
All Done!!! Now you can see newly installed twrp recovery on your Nokia 3 Smartphone.
[C] flash latest supersu root file on Nokia 3
After installation of twrp recovery on Nokia 3, now you are ready to flash supersu file to root Nokia 3 Smartphone.
- Make sure your phone is into twrp recovery mode.
- Select “Format date” to format all files data of your device.
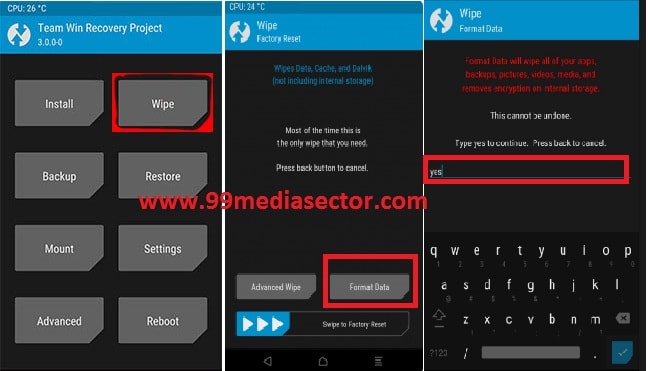
- Again come back to the main menu of TWRP recovery.
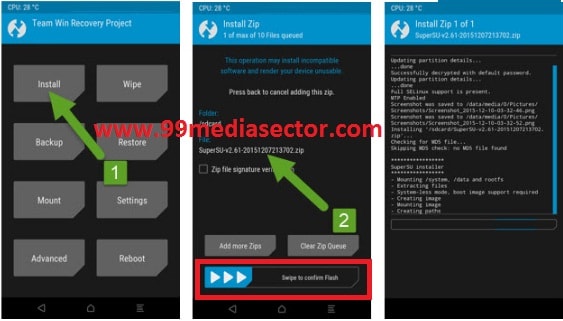
- Now again connect the device with pc and move the “SuperSu zip” into the internal storage of your device.
- This time click on the “Install” option and browse the supersu file and swipe to confirm the flash.

- Here it may take a few minutes to flash a supersu zip file on your Nokia 3 mobile.
- All Done!!! You have successfully rooted your Nokia 3 mobile using supersu root file.
How to check root access on Nokia 3
If you want to check root status of Nokia 3 then take your device in your hand and find the supersu application. If you are able to see it on your device that means you have full root access on Nokia 3 mobile.

Otherwise you can download “Root Checker app” from Google play store. Just download & install it on your pc. Here you can see root status of your device.

This is all about how to root Nokia 3 without risk and how to install twrp recovery on Nokia 3 easily? Now after root you are ready to use root required apps, can flash custom rom to upgrade your device version and also can change IMEI number, device ID to perform other android tweaks.
If your device bricked or dead during the rooting process or you want to unroot the device to get back on stock rom again, please check below Nokia 3 firmware flashing guide.
Flash NOKIA 3 Using OST Tool [Nokia Flash Tool]
Check out Tips & Tricks section to learn more interesting android modes, customizations and tricks.