TWITCH : How To Disable low latency Mode Twitch | Reduce Delay Time
TWITCH : How To Disable low latency Mode Twitch | Reduce Delay Time
No matter if you are a new streamer or a professional streamer on Twitch.Tv. There are many things that you should know if you want to get huge success in streaming through the Twitch platform. In our last post, we talked about “Follower-only chat mode” to control comments on live streams.
In today’s guide we are going to talk about “low latency Mode” which can be a big reason for stream performance issues.
If you are a regular streamer then sometimes you may realize a little bit of a delay between something you and your viewers during live Twitch chat. Mostly this happens when you are live on Twitch and interacting with your viewers. This type of delay is called stream latency and it can be around 10 to 15 seconds. Actually this delay time comes due to transmission from your computer to twitch server then from Twitch to your viewers. By default Twitch uses the “Low Latency Mode” in between streamers and viewers that enables near-real-time communication between streamer and viewers.
But if you are noticing some delay in live chatting that means it may due to low latency mode in Twitch app. Because of this you may see unexpected pauses and buffering.
It’s also important to know that if few viewers are complaining about stream performance issues (delay or buffering) then it’s not required to disable low latency mode. At the same time if the many users are talking about the issue during the live chat that means something is wrong and you should think about it. In that case disabling low latency mode could be the solution.
READ MORE : Turn On Follower Only Chat Mode To Control Comments In Stream
How To Disable low latency Mode Twitch To Reduce Delay Time
In order to manage performance of your live stream, you can turn off low latency mode from the preferences page.
Let’s see how to do that and solve the delay time in Twitch Tv?
- Enter into your Twitch account with your login credentials.
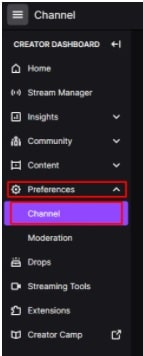
- Next go to the dashboard section. For this click on the “Profile Picture” from top of the page and select the “Creator Dashboard” option from the list.
- Once you are in the “creator dashboard” section, find and expand the “Preferences” category then click on “Channel” option from the list.
- Under the “Channel Preferences”, find the “Latency mode” settings at the bottom of the screen, labeled “Stream Key & Preferences”.
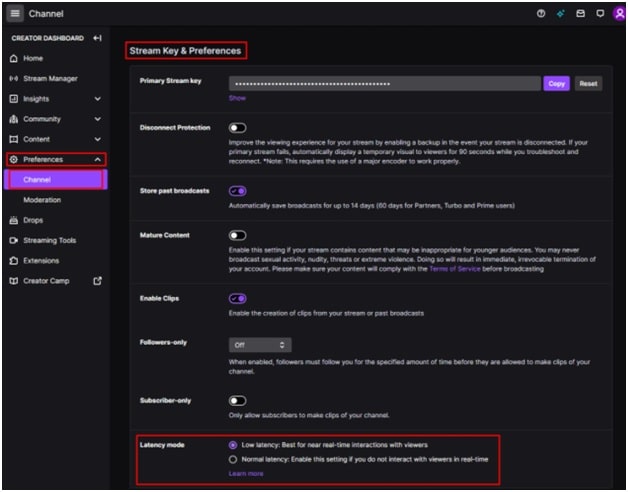
- Here you will be able to select different Latency mode according to your preferences.
- Low Latency Mode: Best for near real-time interactions with viewers.
- Normal Latency mode : Enable this settings if you do not interact with viewers in real time.


- Select the second “Normal Latency mode” radio button in the channel preferences page of the creator dashboard.
What Are Downsides to Activate Low Latency mode?
- Some active users noticed a drop in quality and my viewers LOVE the low latency!
- According to the “User avatarJimtheSFN”, I activated it and a few people had an issue with it so I deactivated it. I rather have all be able to watch then having some suffering and in the end will stop watching/interact with your stream and can also turn away possible new viewers.
- It comes down to the viewer if they can handle the new low latency as it will require more on their end.