Root Samsung Galaxy On8 SM-J710FN & Install TWRP Recovery [100% Working]
Root Samsung Galaxy On8 SM-J710FN & Install TWRP Recovery
Are you a Samsung Galaxy On8 SM-j710FN nougat users and want to install twrp recovery to root Samsung Galaxy On8 SM-j710FN nougat Smartphone? If yes then you are in the right place. Here in this tutorial we will show you how to install twrp recovery on Samsung Galaxy On8 SM-j710FN and how to flash supersu root file?
Last year we told you that you can’t root Samsung Galaxy On8 without a pc [without king root, kingo root & farmaroot app etc].
But now good news is that twrp recovery for Samsung galaxy on8 SM-j710fn is available. Just install twrp 3.1.0-1 sm-j710fn using odin flash tool to replace default stock recovery and then you can root Samsung Galaxy On8 by flashing supersu for magisk file.
All the root files, twrp recovery for Samsung On8 and flash files are available in the download section. Download all necessary root files, twrp recovery and flash tool and follow the below tutorial as it is to gain successful root access on Samsung Galaxy on8 SM-j710FN nougat mobile.
Don’t Miss
Bypass Samsung Galaxy On8 FRP without pc marshmallow
Learn How To Bypass Samsung Galaxy On8 FRP Nougat [new]
Warning- This Samsung galaxy on8 twrp recovery is unofficial twrp recovery and still on beta. Bookmark our site and we will update if we get Official twrp recovery in near future. Rooting may void phone warranty and also can brick your device so do it at your own risk.
Brand –Samsung Galaxy
Model – Samsung Galaxy On SM-J710FN / Samsung J7 (2016)
Flash Tool – Odin Flash Tool
Stability – Stable without any issue
Download Samsung On 8 TWRP Recovery, drivers, Flash tool and root files
Samsung On8 TWRP Recovery 3.1.0-1 Sm-j710fn – Link
SuperSu file [root package] – link
No-verify-no-encrypt file – Link
How To Root Samsung Galaxy On8 SM-J710FN
Once you are ready with all above files then follow the root instructions one by one. Make sure you have enough knowledge about the Odin flash tool, twrp recovery installation and supersu root files.
If not then do it at your own risk. We and our site will not be responsible if anything goes wrong with your device. We tested the root procedure on our own device.
Still want to root Samsung J710fn, go ahead for the next step.
Here we can divide this Samsung Galaxy On8 SM-j710FN root procedure into two different sections.
First you have to install twrp recovery on Samsung Galaxy On8 SM-j710FN nougat mobile. Then you have your own choice, you may flash supersu or the magisk zip file to root your own Samsung galaxy on8.
[a] Install TWRP Recovery On Samsung Galaxy ON8 SM-J710FN
- First off download SuperSu file [root package] & No-verify-no-encrypt file on pc.
- Connect device with pc and transfer both files into external storage or SD card.
- Now enable USB debugging & OEM Unlock [Must]
- Power Off device & boot it into Download mode [ODIN Mode]
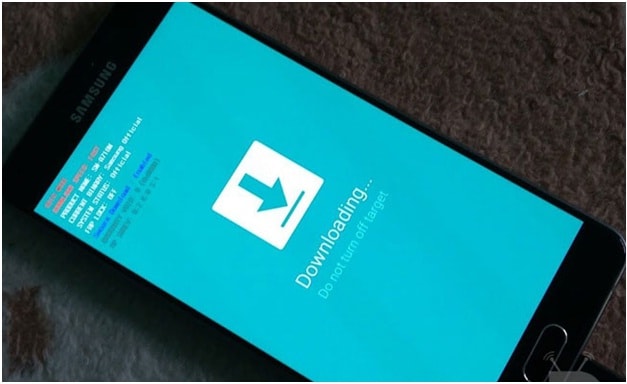
- Connect the phone with pc [make sure device is already booted into download mode]
- Open Odin flash tool folder and run “ODIN.exe” file as administrator.
- Here you will see “added” in the odin tool window that means the device is connected with pc properly.
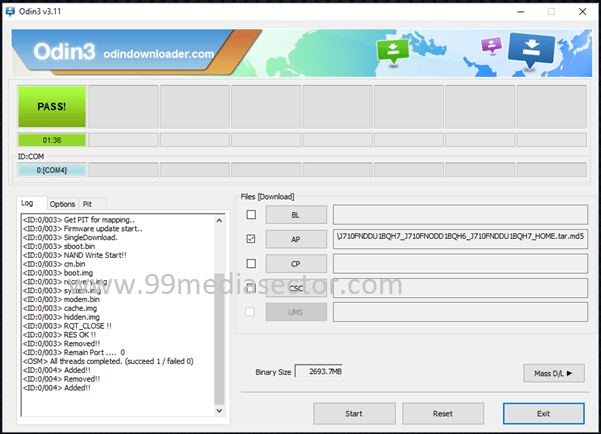
- Now click on the “AP” or “PDA” option and browse the 1.0-1_sm-j710fn_29417.tar file.
- Wait to load the file.
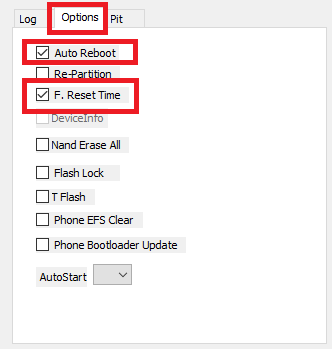
- Open the “Option” tab and configure the tool as shown below.
- Now you are ready to flash twrp recovery on Samsung J710FN nougat mobile.
- Finally hit the “START” button to start the process.
- Process will start and you can see the process bar on the ODIN flash tool and on your mobile screen.
- Wait to complete the process for once and sit back.
- At End of the process, you will see the green “PASS” successful message and the phone will reboot automatically.
- All Done!!! You have successfully installed twrp recovery on Samsung Galaxy On8 SM-j710FN Smartphone.
Samsung Galaxy on8 TWRP Recovery Flashing Logs
<ID:0/003> Added!!

<OSM> Enter CS for MD5..

<OSM> Check MD5.. Do not unplug the cable..

<OSM> Please wait..

<OSM> Checking MD5 finished Sucessfully..

<OSM> Leave CS..

<ID:0/003> Odin engine v(ID:3.1101)..

<ID:0/003> File analysis..

<ID:0/003> SetupConnection..

<ID:0/003> Initialzation..

<ID:0/003> Get PIT for mapping..

<ID:0/003> Firmware update start..

<ID:0/003> SingleDownload.

<ID:0/003> sboot.bin

<ID:0/003> NAND Write Start!!

<ID:0/003> cm.bin

<ID:0/003> boot.img

<ID:0/003> recovery.img

<ID:0/003> system.img

<ID:0/003> modem.bin

<ID:0/003> cache.img

<ID:0/003> hidden.img

<ID:0/003> RQT_CLOSE !!

<ID:0/003> RES OK !!

<ID:0/003> Removed!!

<ID:0/003> Remain Port ....  0

<OSM> All threads completed. (succeed 1 / failed 0)

<ID:0/004> Added!!

<ID:0/004> Removed!!

<ID:0/004> Added!!
Note – If you are not going to root Samsung galaxy on8 after flashing supersu file then it’s must to flash No-verify-no-encrypt file to disable boot verification.
Power off the device again and boot it into twrp recovery by pressing volume up + home + power key together at the same time.
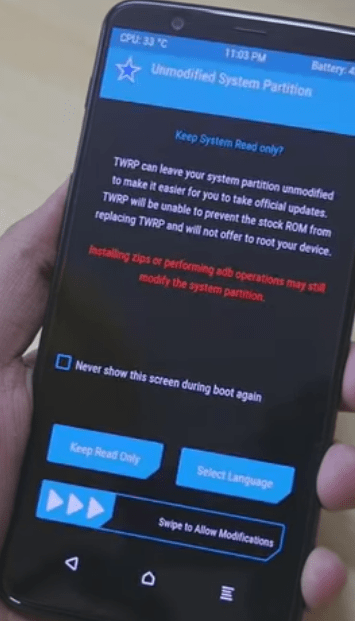
At first boot, it will ask to allow modification, just click on “keep read only” and go for next. Please Note – Swipe to allow modification if you are going to install custom rom using twrp recovery.
[b] Flash Supersu & Root Samsung Galaxy On8 SM-J710FN
Now it’s the time to root Samsung on8 by flashing the Supersu root file. Supersu root files allow you to gain supersu access on your device.
- Boot Samsung Galaxy on8 into twrp recovery.
- Swipe to allow modification or “keep read only” option. [Must if you want to flash rom in future]
- Once you are entered into the main recovery menu, click on “Backup” to take complete backup of your device including ROM.
Backup will help you to restore your default Rom setting, if anything goes wrong in between root process.
- Come back to main menu, click on “WIPE” >> Format Data [OPTIONAL]
This step will wipe all internal storage user data and phone data completely.
- Finally click on “Install” option, choose external storage and browse the root files.
- Now flash SR5-SuperSU-v2.82-SR5-20171001224502.zip file & no-verity-no-encrypt_ashyx.zip file one by one.
- End of the process click on “wipe cache/delvik” and hit on “Do not install” to reboot the device normally.
- Here the device may take a long time to reboot again. Site back and wait to reboot automatically.
- All Done!!!
Congratulations!! You have successfully flashed supersu file to root Samsung Galaxy SM-j710FN On8 mobile.
You may flash Magisk root file to gain root access on Samsung Galaxy on8 [system less root] – check tutorial.
Download & install root checker app and verify root status of your Samsung Galaxy On8. It will show you congratulations!!! You have successful root access on Samsung SM-j710fn device.
Troubleshooting
- Samsung On8 Hang On Samsung Logo – If your Samsung Galaxy On8 stuck on Samsung logo after flash twrp recovery, press and hold power key for few seconds and reboot it again. Otherwise open the battery and reinsert it again to reboot.
- Samsung On8 Bricked- If your device bricked or not booting again, flash Samsung galaxy on8 firmware again using Odin. Flashing guide for Samsung Nougat On8.
Hope this guide will help you to gain root access on Samsung Galaxy On8 Nougat version. Till now getting any issue, please comment below.