How To Root Samsung Galaxy S9 and S9 Plus [Install TWRP Recovery]
How To Root Samsung Galaxy S9 and S9 Plus & Install TWRP Recovery
Samsung Galaxy S9 and S9 Plus Root and TWRP Tutorial: Hey Galaxy S9 & S9+ users, here is a good news for you. Custom twrp recovery is now available for Samsung Galaxy S9 & S9+ android Smartphone. If you want to get root access on your own Samsung S9 or S9+ device then first you have to flash TWRP recovery on Samsung Galaxy S9 [S9 Plus] phone. Once you are able to access TWRP recovery on Galaxy S9/S9+ then flash any Magisk installer or Supersu root file to get Superuser right on the device.
This Samsung Galaxy S9 and S9+ rooting tutorial is 100% working and tested. So you can install TWRP recovery on Samsung Galaxy S9 and S9 Plus without any issue. Chainfire developers are working hard to develop an official CF Root file to root Samsung Galaxy S9/S9+, that could root your device without flashing custom recovery. But till now you have to install twrp recovery on Samsung Galaxy S9/S9+ to flash root package on the device. Don’t worry we will describe all steps with necessary screenshots with video.
But before going through the rooting process, it’s must to know that official twrp 3.2.1.0 recovery is not available for all variant of Samsung Galaxy S9 & S9+ mobile. So you have to check supportable model number of the devices which can be root by using this available method. As we all know galaxy S9 & S9 plus comes with different variant for different regions.
Please pay attention and check compatibility of available TWRP recovery with your own device and then go for next step. Don’t try to flash twrp recovery file on your own Samsung S9 & S9+ if that device is not compatible with below twrp recovery.
Samsung S9/S9+ AT&T, Sprint, T-Mobile, and Verizon variants
At the time of publishing this post, only Samsung Galaxy S9/S9+ Exynos 9810 variant are compatible with available TWRP 3.2.1.0 recovery. In simple terms Samsung S9 and S9+, whose codename are starlte and star2lte & powered by Samsung Own processor are support the below TWRP recovery. And you can root them by flash supersu or magisk using twrp recovery.
Supportable Samsung S9 & S9+ devices– Samsung galaxy S9/S9+ Exynos SM-G960F/FD/N [S9] and SM-G965F/FD/N [S9+]
Non-Supportable Samsung S9 & S9+ – Both devices which sold in China, US and Japan with mode number SM-G960U/U1/W/0/8/SC (S9) and SM-G965U/U1/W/0/8/SC (S9+) can’t be root till now. TWRP recovery is not available for these regions Samsung S9/s9+ variant.
In single sentence, if you bought Galaxy S9/s9+ from Verizon, T-Mobile, Sprint or AT&T, then twrp isn’t available yet and you can’t root them without twrp recovery.
Read More Articles
Enable USB debugging in frp locked Samsung phones
- Update android Oreo 8.0 on Samsung S9 and S9+ [Leaked Build]
- Bypass Samsung frp using combination files
- Flash official android Oreo firmware on Samsung galaxy S8/s8+
- Root Samsung Galaxy S8 & s8+ [all variant]
- Samsung pay issue on galaxy s9/s9+
Other Articles
- Qualcomm FRP bypass tool
- Samsung FRP hijacker tool – FRP bypass tool
- All micromax firmware flashing tool
- Motorola FRP bypass Tool
Root Samsung Galaxy S9 and S9 Plus & Install TWRP Recovery
Please don’t forget to check your device model number from above section. If you have Samsung Galaxy S9 SM-G960F/FD/N and Samsung Galaxy S9 Plus SM-G965F/FD/N then follow the below instructions as it is as shown below and install twrp recovery to root your device.
Warning
Samsung galaxy S9/s9+ phone warranty may void after rooting your device. Continue the process if your are agree and do it only on your own risk. We and our site will not be responsible if anything goes wrong in between rooting procedure. One wrong step may brick your device.
Important
- Charge your device approx. 80% to prevent accidental power off in between flashing process.
- Flashing process will wipe all user data and phone data. So backup is must.
- Keep working original micro USB cable.
- Pc and laptop to apply rooting process.
- Read all the instructions carefully.
Download TWRP Recovery For Samsung Galaxy S9 and S9 Plus
Samsung Galaxy S9 TWRP
- Samsung S9 SM-G965F/FD/N – Download
- Samsung S9 SM-G965U/U1/W/0/2/8/SC – Twrp not available
Samsung Galaxy S9 Plus TWRP
- Samsung S9+ SM-G965F/FD/N – Download
- Samsung S9+ SM-G965U/U1/W/0/2/8/SC – twrp not available
Samsung Galaxy S9/S9+ Root File
Choose any one file to root the device.
- Latest Supersu File
OR
- Latest Magisk File
Flash Tool
How To Install TWRP On Samsung Galaxy S9 and S9+
Samsung devices come with pre-unlocked bootloader. So, no need to unlock bootloader on the device. But you have to replace default stock recovery on Samsung S9/s9+ with custom recovery like TWRP. Flashing twrp recovery is must to root Samsung Galaxy S9 & S9 plus mobile.
Follow the steps and install twrp recovery on Samsung S9 plus and Samsung S9.
Step 0 Enable USB debugging and OEM unlock on the device.
Step is must otherwise device will stuck on frp.
Go to setting >> enter into “Developer Option>> Enable USB debugging & OEM unlock
Step 01 Download appropriate TWRP, Root file and Odin flash tool on the pc or laptop.
Step02 Extract the downloaded “Odin” flash tool and run “Odin.exe” file as administrator.
Step 03 Boot Samsung Galaxy S9 or S9+ into Downloading mode [Odin Mode] using key combinations.
[Power off >> Press & hold Volume down + Bixby + Power key together at the same time. Once you see the warning message, press volume up key again.]
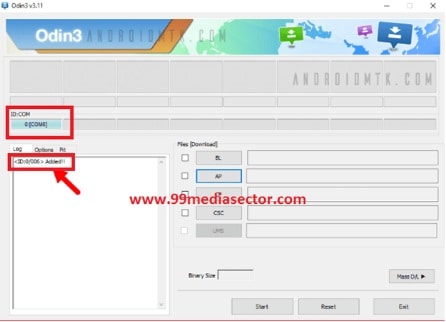
Step 04 Attach the device with pc via micro USB cable.
Step 05 Odin will detect the device automatically and you will see the Added!! Message in Odin message window. Same as you will see blue ID:COM that means Odin successfully recognize the device.
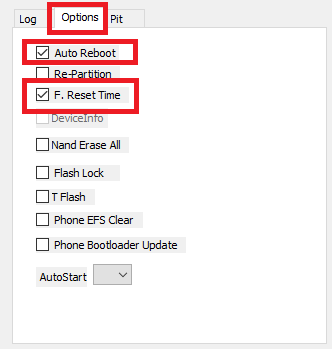
Step 06 Navigate to “Option” section and configure tool as shown below.
Step 07 Now click on “Ap” option and load “Samsung Galaxy S9/s9+ twrp” file from pc.
[TWRP recovery must be in .tar.md5 format. Otherwise you can’t flash it using Odin tool]- TWRP File for Samsung Galaxy S9 (starlte): twrp-3.2.1-0-starlte.tar.md5
- TWRP File for Galaxy S9+ (star2lte): twrp-3.2.1-0-star2lte.tar.md5
Step 08 This is final step. Recheck all the things again. Make sure you have loaded compatible TWRP recovery fro your device. If everything is ok then hit on start button to start twrp flashing process. End of successful flashing, you will see green “PASS” message on the top of the tool.
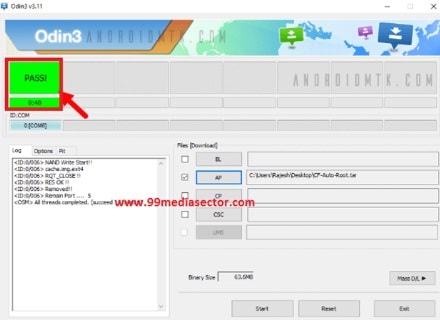
- If the device stuck on Samsung logo, make sure you have loaded correct twrp file for your device. Again boot the device into downloading mode, replug the device with pc, re-launch odin tool and flash twrp recovery again by following above steps.
- If you get Fail message instead of PASS message, re-try the whole process again and install twrp using ODIN tool.
GUIDE: Flash TWRP recovery Using ODIN Flash Tool [Universal Method]
Flash Root File & Root Samsung Galaxy S9 or S9 Plus
After installation of twrp recovery, now it’s the time to get superuser rights on the device by flashing root file using TWRP recovery. For this, you may flash Magisk installer or Supersu exploit. Choose any one file to root Samsung S9 plus or S9 mobile.
GUIDES
- Flash Supersu to root any android phone [Universal Method]
- Flash Magisk to root any android phone [Universal Method]
Here in this tutorial we will show you “how to root Samsung Galaxy S9 plus or S9 using Supersu exploit?”
- Boot Device into Recovery Mode
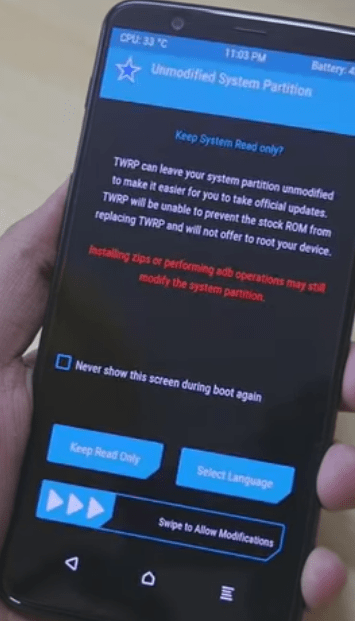
- At first boot you will see the below screen and it will ask to “Read Only” or “Allow for modification”. Here we will recommend you select “Swipe to allow modification”.
- Once you are into newly installed TWRP recovery, click on “Wipe” option and then select “Format Data” option. [Step is must for clean flashing and it will wipe all data of the device completely]
GUIDE: Nandroid bachup using twrp recovery
- Now connect the device with pc, while it’s still in twrp recovery. Copy and transfer the supersu zip file into internal storage of the device [Without any folder].
- Next, tap on “Install” option and browse the supersu file from internal storage of the device. Finally swipe to flash the supersu file and flashing process will take few miutes to complete.
- End of the flashing process, click on “Wipe cache/Delvik” option and “Swipe TO Wipe” again.
- Click on “Do not install” option and reboot the device normally.
All done!! Wait to reboot the normally and enjoy twrp & root access on Samsung Galaxy S9 & S9+.
That’s all about how to install twrp recovery on Samsung Galaxy S9 and S9 Plus & how to root Samsung Galaxy S9 and S9 Plus using supersu or magisk?” Hope this guide will help you to gain full root access on your own Samsung S9+ and s9 mobile to apply different custom rom, kernel, android tweaks & tricks and different mode apps etc.
Sometime it may possible, you will flash wrong firmware on your Samsung phone without enable OEM on that condition you may face “custom binary blocked frp lock” error. Check below guide to fix that error.
Fix custom binary blocked by FRP lock error
Till now getting any issue in any step, please feel free to ask us by leaving your valuable comments.