No verity opt Encrypt Download Latest Version [How TO Use]
No verity opt Encrypt Download Latest Version [How TO Use]
Confused about No verity opt Encrypt file, its normal but dont worry about it. We will try to explain all about No verity opt Encrypt, its use and how to flash No verity opt Encrypt on android Smartphone during the rooting process.
No-verity-opt-Encrypt is a simple zip format file to disable boot verification and forced encryption. This small size No-verity-opt-Encrypt tool helps us to prevent our device to stuck on bootloop.
In simple word, No verity opt Encrypt is a bunch of files to encrypt the boot data when we apply any rooting process or try to flash any custom ROM on our android Smartphone.
If you are an advance android users and love to customize or modify your device then rooting is perfect for you. After getting root access on your own device you can apply different android tweak & trick, modes and customization to use it with full potential.
But sometime it may possible, your device stuck on logo or bootlopp after root or custom recovery installation. So to prevent this type of critical situation, flash latest No verity opt Encrypt zip file and disable boot verification.
Now here is an example to learn why you need to use No-verity-opt-Encrypt file? As we all know most of the latest android Smartphone like Samsung galaxy Note 7 comes with dm-verify check and forced encryption security layer. Actually it’s an additional security layer to protect data stored on our device.
But as we already told you, if you want to root your device then you have to remove or disable this extra security layer of the device to make your root process easier.
Unfortunately there are no any direct option is available on the device to disable dm-verify and forced encryption. So if you try to install twrp recovery on your device without disable dm verify and forced encryption it may cause of bootloop or device will stuck on logo. Its actually a soft brick situation.
Solution is very simple, install twrp recovery on your device and flash No verity opt Encrypt package to disable dm verify, forced encryption or boot verification.
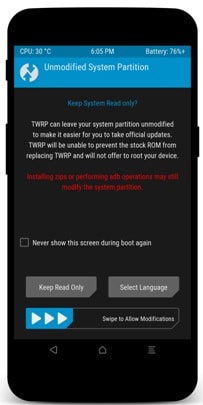
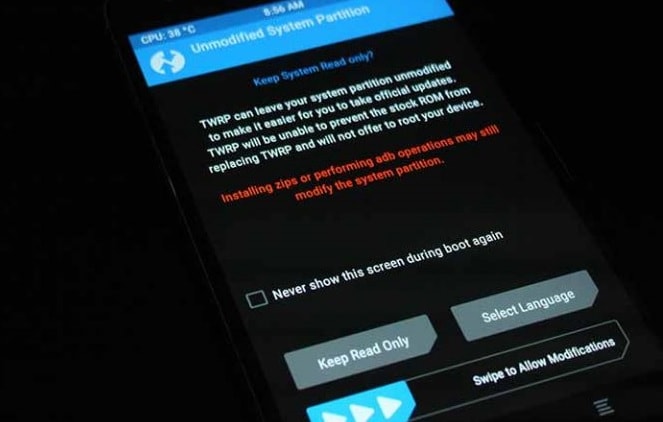
IMPORTANT – At first boot on TWRP recovery, newly installed twrp recovery will ask to allow modifications. Make sure you are selecting only “Read Only” option. For this set the system mode on “read only” !!! Because by default, Xiaomi phones come with secure boot enabled feature from the manufacturer. so any changes made to the system partition lead to a boot loop. So it’s highly recommended to set it on “read Only” option.
Now you have two choice, simply flash Supersu or magisk root file after install twrp recovery. It will root your device. But if you don’t want to root your device then flash No verity opt Encrypt file just right after twrp recovery installation. It will disable dm-verify and forced encryption on your device.
Supported Smartphones Models
- Samsung
- Xiaomi And Redmi
- LG
- OnePlus
- Sony and some other devices
Download No-verity-opt-Encrypt All Versions
No-verity-opt-Encrypt V3.1 : DOWNLOAD / MIRROR
No-verity-opt-Encrypt V3.2 : DOWNLOAD / MIRROR
No-verity-opt-Encrypt V4.0 : DOWNLOAD / MIRROR
No-verity-opt-Encrypt V4.1 : DOWNLOAD / MIRROR
No-verity-opt-Encrypt V5.0 : DOWNLOAD / MIRROR
No-verity-opt-Encrypt V5.1 : DOWNLOAD / MIRROR
No-verity-opt-Encrypt V6.0 : DOWNLOAD / MIRROR
No-verity-opt-Encrypt for Samsung Galaxy Note 7
No-verity-opt-Encrypt [Samsung Edition]
Download Latest SuperSu Root File
How TO Flash No verity opt Encrypt To Avoid Bootloop Error
In order to flash No verity opt Encrypt file you have to download No-verity-opt-Encrypt zip file from above download section and flash the script via TWRP or any recovery just like other zip.
Instructions To Disable dm-verify and forced encryption On any Device
- Download No verity opt Encrypt zip file & SuperSu file and transfer them to your device storage. [ Select internal storage or external storage ]
- Install TWRP Recovery and Boot device into newly installed twrp recovery manually.
- Once your device will boot into twrp recovery, it will ask to “allow system modification”, swipe to confirm.
- Disable dm-verify and forced encryption
Now you can disable dm verify and forced encryption or boot verification with root and without root.
Disable dm-verify and forced encryption Without Root – If you only want to access twrp recovery only and don’t want to root you device then click on “Install” option from twrp recovery and flash No-verity-opt-Encrypt script to disable dm-verify and forced encryption.
- End of the process click on “wipe cache/delvik” and select “reboot system”.
- All done!!!
That’s all about “how to disable dm-verify and forced encryption on any SMARTPHONE?” OR “how to use No-verity-opt-Encrypt script?”