Nokia 3 TA-1032 FRP Remove With Miracle Box [Flash/FRP/Format]
Nokia 3 TA-1032 FRP Remove With Miracle Box [Flash/FRP/Format]
Remove Nokia 3 TA-1032 frp or Google account verification using Miracle tool box. If you are using Nokia 3 TA-1032 android smartphone and the device is stuck in Google account verification [FRP] after factory reset then this post may help you to bypass Nokia 3 TA-1032 frp within single click. Moreover, we will show you how to create scatter file for Nokia 3 TA-1032 using Miracle tool. Once you have nokia 3 TA 1032 scatter loading file, you can flash it via sp flash tool or using any other scatter file flashing tool.
So in this tutorial we will talk about “How to format Nokia 3A using Miracle box, how to remove Nokia 3A FRP locl using Miracle box and how to create scatter loading file using Miracle tool?”

To make it easier to understand, we are describing the whole process in two different sections. NOKIA 3 FRP removal and format process is same but Nokia 3 TA-1032 scatter file creating process is different.
As we already told you, it’s an easiest method to remove FPP on Nokia 3 TA 1032 via Miracle tool 2.81. No need to flash firmware and no need to unlock bootloader of the device to remove frp lock on Nokia 3 mobile.
Process is same for all MediaTek or MTK chipset based android device like oppo, vivo, tecno, infinix, Micromax, Motorola and Lenovo etc. Testing device is Nokia 3 TA-1032 Indian variant but you can follow the complete process on Nokia 5, Nokia 6 and Nokia 7 as well as on any MTK android.
Pre-requirements For Nokia 3 TA-1032 FRP Remove With Miracle Box
- Premium version of Miracle tool box 2.81 [Thunder Edition]
- Working Micro USB cable to plug device with pc.
- Miracle 2.81 box.
- Charge the device approx. 80% to prevent accidental power off in between process.
Download Free Miracle Tool Without Box
Free Miracle 2.27 / Miracle 2.54 / Mracle 2.58
Bypass Nokia 3 TA-1032 FRP Lock Using Miracle Flash Tool
Instructions To Remove Nokia 3 TA-1032 FRP Lock Using Miracle tool
- First off all launch Miracle Thunder Tool 2.81 on pc.
- Now configure Miracle tool 2.81 as shown below.
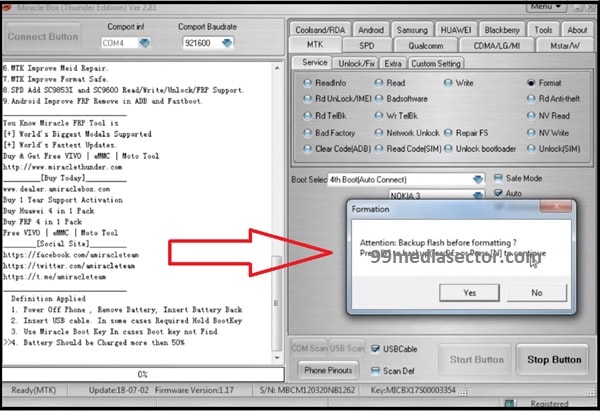
Click on “MTK” tab >> “Service” tab >> tick mark on “Format” option >> select “4th boot [Auto Connect]” >> Select device name “Nokia 3” >> Untick “Safe Mode” and Select “Auto” & “Advanced [FRP]” option.
Make sure you are going to configure the tool as it is as shown in below screenshot.

- Finally click on “STAR” button to continue the process.
- Now a new pop message will appear in front of you to take backup of flash device before formatting. Just click on “No” to continue for next step.
NOTE: Backup is not required because, device is already frp locked and it’s useless.
- Come to the device and power off it properly. Once the device OFF, connect it with pc via USB cable without pressing any key.
- Now tool will start the process and will show a new window again in front of you. Tick mark on “FRP” and “USERDATA” option as shown in screenshot and then hit “OK” button. By using these options, device will factory reset as well as frp removed after flashing. [Don’t worry it will not flash firmware]
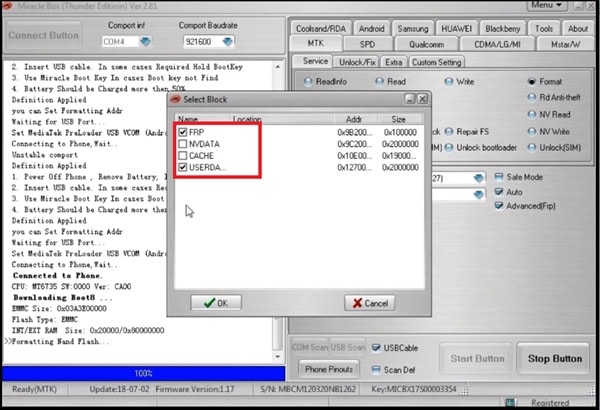
- Now device will reboot automatically. This time it will not ask you to enter your existing Google account ID & password to unlock Nokia 3 FRP lock. ALL Done!!!
Wait for reboot the device normally and setup it again as a new device. Device is unlocked and formatted [Hard Reset].
As you can see, Nokia 3 TA 1032 frp unlock done via Miracle tool without firmware flashing. Now you can add new Google account on your device without any issue. This process is very helpful if you forgot pattern lock, PIN Lock and Google account ID & password. Simply follow the above process and it will unlock Nokia 3 TA 1032 android mobile within few minutes without flashing Nokia 3 stock ROM.
How To Create Scatter File For Nokia 3 Using Miracle Tool
Create Scatter File To Flash Nokia 3 TA-1032 Android Mobile
This section is only for knowledge base. It’s not required to remove frp lock. But you can flash Nokia 3 Ta 1032 using sp flash tool in feature.
Steps To Create Nokia 3 TA 1032 Scatter File For Flashing
If you are here on this post only for Nokia 3 Ta 1032 frp removal then it’s already over in above section. This section is only for educational basis. By using this method you can learn how to create scatter loading file for any MTK mobile using Miracle tool? We are creating scatter file for Nokia 3 TA 1032 mobile using Miracle box.
- First off all launch Miracle tool 2.81 version on pc as administrator.
- Now configure the miracle tool as shown below.
Click “MTK” tab >> “Service” Tab >>> tick on “Read” option >> select “8th boot [MT65xx & MT67xx/8127]” >>> Select device name “Nokia 3” >> tick mark on “Save as Scatter file”
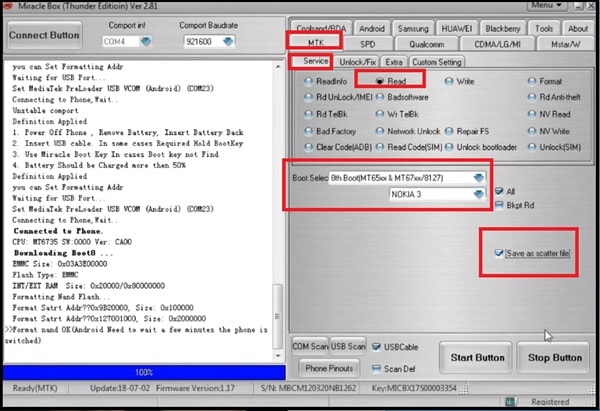
- Finally click on “START” button to start firmware “read” process.
- Now power off the device and connect it with pc via USB cable without pressing any key.
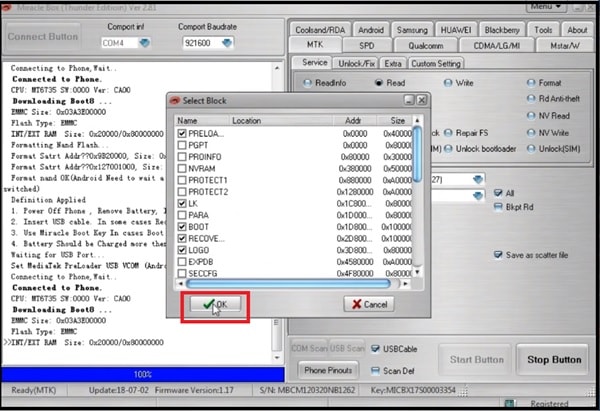
- As soon as device recognized by the tool, process will start and new pop up message will appear in front of you. Just click on ok to continue to scatter file creation.
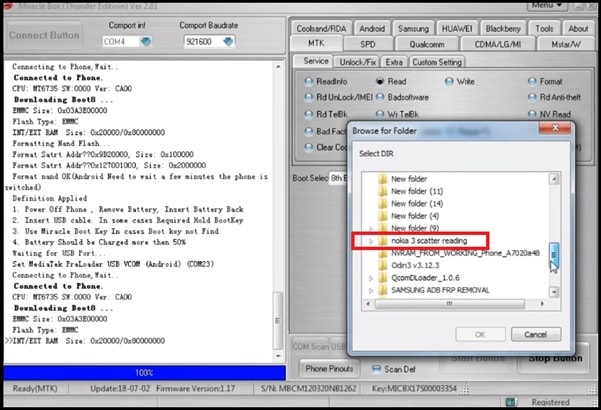
- Next, select the place where you want to store the “new scatter file of Nokia 3”. You can save it anywhere on your pc.
- Now reading will start automatically and it may take few minutes to create new scatter file of Nokia 3 mobile. So don’t stop the process in any how condition.
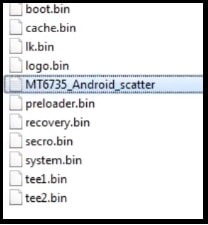
- End of the process, device will reboot in normal mode and you can check newly created Nokia 3 firmware folder with scatter loading file [MT6735_Android_Scatter.txt].
Benefits To Create Scatter File
Main benefit of creating scatter loading file is that no need to download firmware of the device from external sources. Moreover, you can flash it to unbrick Nokia 3 TA-1032 android mobile by Miracle tool or using free sp flash tool.
If you are new and don’t know Sp flash tool firmware flashing process, please follow the below guide. It’s an universal method to flash stock ROM firmware on any MTK android mobile.
flash Firmware Using SP flash Tool
Direct Link To Download Nokia 3 TA-1032 Firmware [Scatter Format]
Flash Nokia 3 TA-1032 Using OST Tool
So guys this is all about “how to remove Nokia 3 TA-1032 Factory reset protection or FRP lock using Miracle tool?” Till now getting any issue in any step, please leave your comment below.